Navigation
Install the app
How to install the app on iOS
Follow along with the video below to see how to install our site as a web app on your home screen.
Note: This feature may not be available in some browsers.
More options
Style variation
You are using an out of date browser. It may not display this or other websites correctly.
You should upgrade or use an alternative browser.
You should upgrade or use an alternative browser.
Rupes side by side detail - 1955 Crown Victoria
- Thread starter Mike Phillips
- Start date
ShaunD
New member
- Nov 19, 2010
- 1,255
- 0
Mike you are a machine! I have to get with the program and start buffing out whole cars in 5 hours.")
Were you using the "clean your pad on-the-fly" technique? Looks like those pads really pull product into themselves. Are the pads comparable to hydro tech pads? I like the looks of the design of them.
Excellent work as usual and thanks for always replying to us as usual.") FWIW, "Bennett" means been, according to my phones predictive text.LOL
FWIW, "Bennett" means been, according to my phones predictive text.LOL
BTW, which of your projects did you work on this weekend?
Sent from my SAMSUNG-SGH-I897 using AG Online
Were you using the "clean your pad on-the-fly" technique? Looks like those pads really pull product into themselves. Are the pads comparable to hydro tech pads? I like the looks of the design of them.
Excellent work as usual and thanks for always replying to us as usual.
FWIW, "Bennett" means been, according to my phones predictive text.LOLBTW, which of your projects did you work on this weekend?
Sent from my SAMSUNG-SGH-I897 using AG Online
WRAPT C5Z06
New member
- Nov 12, 2009
- 12,615
- 0
Yes. Helps A LOT!Isn't this eliminated by adding the spacer washer as recommended and tested by Kevin Brown??
Mike Phillips
Active member
- Dec 5, 2022
- 51,004
- 7
- Thread starter
- #44
***Finished***

The owners are on their way here to pick her up. :dblthumb2:
Doing a two-step correction and polishing process with both the Rupes 21 and 15 on a car with this much real-estate really gave me a the time behind these two polishers to become familiarized with their unique buffing characteristics.
The Rupes pads and products worked flawlessly, as I've posted elsewhere on this forum, the key to any brand of car care appearance products is the abrasive technology the paint care products use and Rupes definitely uses top shelf abrasive technology.
If you're new to Rupes polishers you need to focus on your technique and use only light pressure when using these tools for correction and polishing work.
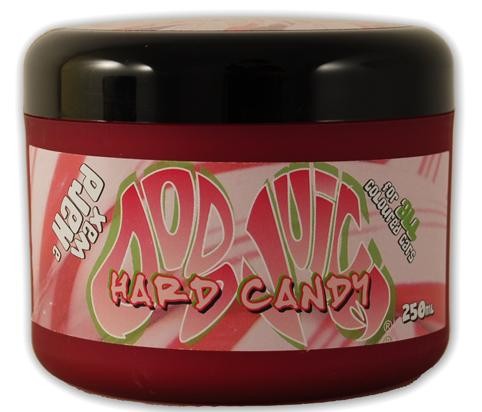
The Rupes Mini Polisher worked excellent to machine apply the Dodo Juice Hard Candy Wax as I would rather use any type of machine to seal the paint then work by hand.
As soon as Yancy has the time lapse video completed I'll share it on the forum...
I let the GoPro Camera run while I machine waxed the paint but at some point the battery died and it stopped filming, so I don't know how much of the machine waxing step it captured.
I had to leave work right after applying the Hard Candy Wax so I removed it this morning and for a car this size, after a quality Carnauba wax like Dodo Juice Hard Candy dries overnight that can be a good workout.
Below are the approximate times for buffing out each side of this car with the different tools, the times are close enough that I would not purchase one tool over the other nor recommend one tool over the other for any "time factors" but I would say that for most people, buffing out most modern cars with their modern body panel designs, the Rupes 15 with the 5" backing plate and the 6" pads will be a better match.
One thing for sure, this car came in a swirled-out mess and it's leaving with a flawless, show car finish thanks to Rupes polishing system and a little sealing help from Dodo Juice Carnauba Waxes.
On Autogeek.net
Rupes LHR21ES Random Orbit Polisher
Rupes Zephir Gloss Coarse Gel Compound 500 ml.
Rupes Quarz Gloss Medium Gel Compound 500 ml.
Rupes Keramik Gloss Fine Gel Polish 500 ml.
Rupes Diamond Ultra Fine Gel Polish 500 ml.
RUPES Color Matched 7" Foam Buffing Pads
All RUPES Polishers, Pads and Polishes

Dodo Juice Hard Candy Hard Wax 250 ML
:dblthumb2:
The owners are on their way here to pick her up. :dblthumb2:
Doing a two-step correction and polishing process with both the Rupes 21 and 15 on a car with this much real-estate really gave me a the time behind these two polishers to become familiarized with their unique buffing characteristics.
The Rupes pads and products worked flawlessly, as I've posted elsewhere on this forum, the key to any brand of car care appearance products is the abrasive technology the paint care products use and Rupes definitely uses top shelf abrasive technology.
If you're new to Rupes polishers you need to focus on your technique and use only light pressure when using these tools for correction and polishing work.
The Rupes Mini Polisher worked excellent to machine apply the Dodo Juice Hard Candy Wax as I would rather use any type of machine to seal the paint then work by hand.
As soon as Yancy has the time lapse video completed I'll share it on the forum...
I let the GoPro Camera run while I machine waxed the paint but at some point the battery died and it stopped filming, so I don't know how much of the machine waxing step it captured.
I had to leave work right after applying the Hard Candy Wax so I removed it this morning and for a car this size, after a quality Carnauba wax like Dodo Juice Hard Candy dries overnight that can be a good workout.
Below are the approximate times for buffing out each side of this car with the different tools, the times are close enough that I would not purchase one tool over the other nor recommend one tool over the other for any "time factors" but I would say that for most people, buffing out most modern cars with their modern body panel designs, the Rupes 15 with the 5" backing plate and the 6" pads will be a better match.
One thing for sure, this car came in a swirled-out mess and it's leaving with a flawless, show car finish thanks to Rupes polishing system and a little sealing help from Dodo Juice Carnauba Waxes.
On Autogeek.net
Rupes LHR21ES Random Orbit Polisher
Rupes Zephir Gloss Coarse Gel Compound 500 ml.
Rupes Quarz Gloss Medium Gel Compound 500 ml.
Rupes Keramik Gloss Fine Gel Polish 500 ml.
Rupes Diamond Ultra Fine Gel Polish 500 ml.
RUPES Color Matched 7" Foam Buffing Pads
All RUPES Polishers, Pads and Polishes
Dodo Juice Hard Candy Hard Wax 250 ML
:dblthumb2:
TheCougarGuy
Member
- Apr 13, 2010
- 589
- 0
Mike, it looks like the blue pads are pretty beat up. Are they shot or will they be able to be used for more corrections?
WRAPT C5Z06
New member
- Nov 12, 2009
- 12,615
- 0
Sounds pretty familiar to me.Mike, it looks like the blue pads are pretty beat up.
Ray@Autogeek
New member
- Mar 20, 2012
- 785
- 0
WHOA! Just saw this Crown Vic in front of the warehouse and it looks GOOD! Nice job Mike!
TheCougarGuy
Member
- Apr 13, 2010
- 589
- 0
Sounds pretty familiar to me.
I know you said that last week...
Mike Phillips
Active member
- Dec 5, 2022
- 51,004
- 7
- Thread starter
- #51
Mike, it looks like the blue pads are pretty beat up. Are they shot or will they be able to be used for more corrections?
Yes. I use my cutting pads to the very last cell structure...
When I used to detail cars full time as pads became tatty, I would save them for rough work like buffing out painted boat trailers, horse trailers, anything that you wouldn't call "nice" and "easy" to buffing out in the first place.
I will hand wash these cutting pads and use them again.
Keep in mind this is a HUGE car. For the 6" pad, I bumped the pad while buffing into a couple of trim edges a number of times... I try to be careful and buff like a surgeon but sometimes I might as well be blindfolded...

Mike Phillips
Active member
- Dec 5, 2022
- 51,004
- 7
- Thread starter
- #53
Thanks Yancy for the time lapse. The music really set the mood to make it feel epic.LOL
Don't feed his ego too much... we all have to work with this guy...
Now you just need to get a better power source for the GoPro, or Mike needs to work even faster. JK LOL
Next time we'll work on the power source and also use a faster capture rate to show more of the work being done.
I'm sure if doing a "time capture" of a complete multi-step paint polishing process has ever been posted before? Regardless, there's a learning curve to everything...
Although this car was a LOT of work due to its size it was also a lot of fun to polish out. At least to me... I like this kind of work.
spiralout462
New member
- Dec 14, 2012
- 1,771
- 0
I really enjoyed the thread guys! Thanks Mike and Yancy. Another quality job cranked out of the Show Car Garage!
Mike
How many blue pads did you use on each side? Did you fully prime the pads during compounding step or just apply a few blobs? At one point during the beginning it looked like you laid a bead of product (roof)... did you "pick up the bead" or that's not what I seen (curious since this is a DA)? Thanks
How many blue pads did you use on each side? Did you fully prime the pads during compounding step or just apply a few blobs? At one point during the beginning it looked like you laid a bead of product (roof)... did you "pick up the bead" or that's not what I seen (curious since this is a DA)?
ThanksMike Phillips
Active member
- Dec 5, 2022
- 51,004
- 7
- Thread starter
- #57
Mike
How many blue pads did you use on each side?
One 7" for the Rupes 21/Passenger side
One 6" blue pad for the Rupes 15/Driver's side
One 3" blue pad on the LHR75 Mini Polisher for the tight areas on both sides.
I could have used more pads but my goal was to put all the pads to the test. Lots of people new to machine polishing purchase the minimal amount of "products" when they are getting started.
In a perfect world, and what I always recommend is...
More pads are better...
Let your budget be your guide.
Did you fully prime the pads during compounding step or just apply a few blobs?
At one point during the beginning it looked like you laid a bead of product (roof)... did you "pick up the bead" or that's not what I seen (curious since this is a DA)?
I never primed a single pad with the Rupes system. A couple of times for,
- Testing purposes
- For vertical sides
That's where I laid a strip of product onto the panel about the size of a pencil.
Next I turned the polisher on and locked it into the on position with the 9 'O'Clock portion of the pad lightly touching the paint.
Then in a sweeping fashion I picked up my my bead of product at the 3 'O'Clock position with the pad lifted about 10 to 15 degrees and then run the polisher over the bead of product and when you get to the end of the bead lay the pad flat against the surface and then spread the product out.
After spreading the product out then start working the section.
I do something similar with the Flex most of the time. About the only time I put drops on the face of the pad is with the PC type of polishers.
Picking up a bead of product on the fly works best for me with this tool, just had to play around a little bit to see which direction, speed and angle.
Good eyes...
Mike Phillips
Active member
- Dec 5, 2022
- 51,004
- 7
- Thread starter
- #58
never used hard candy,is there a reason you picked that over all the others you can pick from?beautiful work by the way
I wanted to use a traditional Carnauba hard wax for sure because a good hard wax imparts a nice hard, glossy shine and there's a lot of white paint on this car and the goal for white paint is good gloss.
Besides that, I like Dodo Juice waxes and haven't showcased one for a while. In the past I have shown these,
1972 Corvette Stingray - Extreme Makeover - Process and Products Used
Mike Phillips & pj Aass Show YOU How to Make Your Own Wax!

1957 Chevrolet Bel Air

It didn't wipe off too hard after drying all night long, which I was a little worried about. It did give me a good work out though...
One 7" for the Rupes 21/Passenger side
One 6" blue pad for the Rupes 15/Driver's side
One 3" blue pad on the LHR75 Mini Polisher for the tight areas on both sides.
I could have used more pads but my goal was to put all the pads to the test. Lots of people new to machine polishing purchase the minimal amount of "products" when they are getting started.
In a perfect world, and what I always recommend is...
More pads are better...
Let your budget be your guide.
I never primed a single pad with the Rupes system. A couple of times for,
I applied 3 dime sized drops to the face of the pad but what I found worked best for me was a modification of the 10 @ 10 Technique I show for use with rotary buffers and used the 10 @ 3 technique.
- Testing purposes
- For vertical sides
That's where I laid a strip of product onto the panel about the size of a pencil.
Next I turned the polisher on and locked it into the on position with the 9 'O'Clock portion of the pad lightly touching the paint.
Then in a sweeping fashion I picked up my my bead of product at the 3 'O'Clock position with the pad lifted about 10 to 15 degrees and then run the polisher over the bead of product and when you get to the end of the bead lay the pad flat against the surface and then spread the product out.
After spreading the product out then start working the section.
I do something similar with the Flex most of the time. About the only time I put drops on the face of the pad is with the PC type of polishers.
Picking up a bead of product on the fly works best for me with this tool, just had to play around a little bit to see which direction, speed and angle.
Good eyes...
Nice, Thanks for the detailed reply.
ShaunD
New member
- Nov 19, 2010
- 1,255
- 0
Yeah Mike, thanks for the replies. I wasn't knocking you and Yancy about the battery issue. Just poking fun. God knows most of my life has been spent in the trial and error mode trying to catch-up to the learning curve.LOL
With the busy schedule you carry Mike I am always just amazed out how much you pack into it and always at such high quality. Okay, now you and Yancy wont be able to fit in the same room with those big heads.LOL
Maybe I missed it but did you clean the pad on-the-fly? Not critiquing either way just wondering how the Big Foot system performed with so much use on each pad. Guess either way that would be normal pad count/use. You used six pads total for compound and polish steps?
BTW, What did the owners say when they picked up the Crown? Would bet they were excited to see it to say the least.
Sent from my SAMSUNG-SGH-I897 using AG Online