Navigation
Install the app
How to install the app on iOS
Follow along with the video below to see how to install our site as a web app on your home screen.
Note: This feature may not be available in some browsers.
More options
Style variation
You are using an out of date browser. It may not display this or other websites correctly.
You should upgrade or use an alternative browser.
You should upgrade or use an alternative browser.
The benefits of a light paint cleaner, cleansing lotion or pre-wax cleaner
- Thread starter Mike Phillips
- Start date
Mike Phillips
Active member
- Dec 5, 2022
- 51,004
- 7
- Thread starter
- #22
looks like prev wax has to be removed by polish or cleaner to stick to paint - isn't it?
Cleaning the paint before applying a new coat of wax or paint sealant insures the surface is clean and free from any kind of surface contamination and impurities. This will maximize the clarity, depth and gloss and create a fresh base for the new protection ingredients to bond to.
can wax cleaner eliminate clay step for lazy?
Not really as claying is the most effective way to remove above surface bonded contaminants. using a polish or paint cleaner by hand can remove some of any built-up above surface bonded contaminants, but using detailing clay is the most effect way to remove above surface bonded contaminants.
Here's two related articles...
The benefits of a light paint cleaner, cleansing lotion or pre-wax cleaner
How to use a hand applied abrasive polish or paint cleaner by hand
")
indianaryan
New member
- Sep 1, 2010
- 81
- 0
Thanks Mike. I got a new car recently and I used the Wolfgang Paintwork Polish Enhancer and the Deep Gloss Paint Sealant. I did the same on a couple of my friends' cars and it's about time to do it again. I've found that a little DGPS goes a long way, as I've used much more of the Wolfgang Polish than the DGPS. I'm very impressed with both products.
Dan Metzler
New member
- Oct 11, 2010
- 217
- 0
Mike, I just tried the Pinnacle Lotion today after M205 and thought it left the paint slicker than just the M205 alone. I did however do an IPA wipedown after M205 and prior to the lotion....was that a wasted step? I also did another IPA after the lotion...probably another wasted step. LSP was 845 FWIW.
Now sorry if i ask something thats already been answered but, like the Meguiar's 5 step process the second step says to clean (paint cleaner) and the third step says to polish and the wax? Im sure this has been asked many times so can someone send me a link to better understand what process should be taken? And should it be done every time? Again sorry I'm a detail oriented person that has to dissect everything. (that could be a good thing) rops:
rops:
rops:Mike Phillips
Active member
- Dec 5, 2022
- 51,004
- 7
- Thread starter
- #27
Now sorry if i ask something thats already been answered but, like the Meguiar's 5 step process the second step says to clean (paint cleaner) and the third step says to polish and then wax?
That's correct for the Meguiar's system because they offer non-abrasive polishes that the primary purpose of which is to simply add gloss and clarity.
Most polishes contain abrasives, but with a non-abrasive polish you could add another step that doesn't including any abrading or cleaning effect.
I actually wrote the original "The 5-Step Paint Care Cycle" article, Mike Stoops re-wrote it and updated it with pictures of new products after I left Meguiar's. He's actually re-written a few of my articles and he's done a really good job but some of his articles are actually articles I originally wrote.
When I went to work for Meguiar's the second time in 2002 starting out as the "Corporate Write", I took it upon myself to write "The 5-Step Paint Care Cycle" because they didn't have anything or at least any "article" that explained it in detail. They had a graphic picture and some copy around products used for each of the steps but they didn't have a thorough, complete article that explained the idea of maintaining your car's paint via 5-steps.
I still have the original version I wrote because when Mike Stoops re-wrote my article he removed a lot of the original content, which made it much shorter and less in-depth as my curse is being a long copy writer and I tend to go into a lot of depth. Most people don't want the depth, just the short answer. (Sorry, again it's a curse to be a long copy writer).
Back to your question, in the early days, when we only had single stage paints, after cleaning or abrading the paint, (I have an article on MOL on the topic of "cleaning" as Meguiar's defines it), the next step would be to apply a pure or non-abrasive polish, which would be absorbed into the permeable or porous single stage paint and create depth and richness of color. IT would also act to create a glossy finish, all characteristics "Car Guys and Gals" like to see in their car's paint.
With modern clear coats, the paint is dramatically less porous, or impermeable, and so the polishing oils found in products like #7 Show Car Glaze, #3 Machine Glaze, #5 New Car Glaze, #81 Hand Polish, Deep Crystal Polish, (These are all non-abrasive, pure polishes), will tend to be topical, that is sitting on the top surface of the paint, not penetrating into the paint.
So some people don't see any benefit to applying a pure, non-abrasive polish after the cleaning step especially in light of the fact that today, modern "light polishes" leave the paint looking flawless and a pure polish don't tend to build-on or increase the achieved results.
Also, something people forget is a brand new car with brand new factory paint already looks GREAT, it's really hard to make a dramatic change in before and after by simply applying a non-abrasive polish or even a wax or paint sealant for that matter. That's one of the cool things about modern paint technology, it' looks good right out of the booth.
In the old days, after spraying a solvent-evaporation paint like single stage lacquer or enamel, especially with lacquers and the spray gun technology used back then, it WAS easy to make the paint look better by either machine buffing, or wetsanding and then machine buffing. In some cases, if you go back far enough they would hand-rub the paint to increase the gloss, clarity and richness of color of a single stage lacquer paint job and that's where the term,
"Hand Rubbed Lacquer Paint"
came from... Note how you never hear the term,
"Hand Rubbed Basecoat/Clearcoat Paint"
That's because modern clear coats tend to be harder, in fact so much harder that it's really hard to rub one out like you would the old school way with a soft lacquer paint... but I digresss...
See these articles,
The practical differences between single stage paints and a clear coat paints
The Lesson White Paint Teaches Us
And see this article for some in-depth information on #7 Show Car Glaze and how it works with single stage paints.
The Secret to Removing Oxidation and Restoring a Show Car Finish to Antique Single Stage Paints
Excerpt... (it's really long with lots of pictures)
Mike Phillips said:This is key...
Saturation Application --> The First Application
This is a mostly unknown technique and that is to let the first application penetrate and soak into the paint for up to 24 hours before wiping the product off. The idea being to really apply the product wet and work it in really well and the walk away.
The idea is to allow the heavy concentration of oils to penetrate and seep into the paint for maximum saturation before removing the product and continuing with the process. In this case I finished applying the first application of #7 around 9:00 pm and then left the #7 to soak in until the next day. I started wiping the product off then next morning right about 10:00am.
Some will argue if this works or not buy my experience is that with a porous single stage paint it does in fact help. One thing for sure it can't hurt.
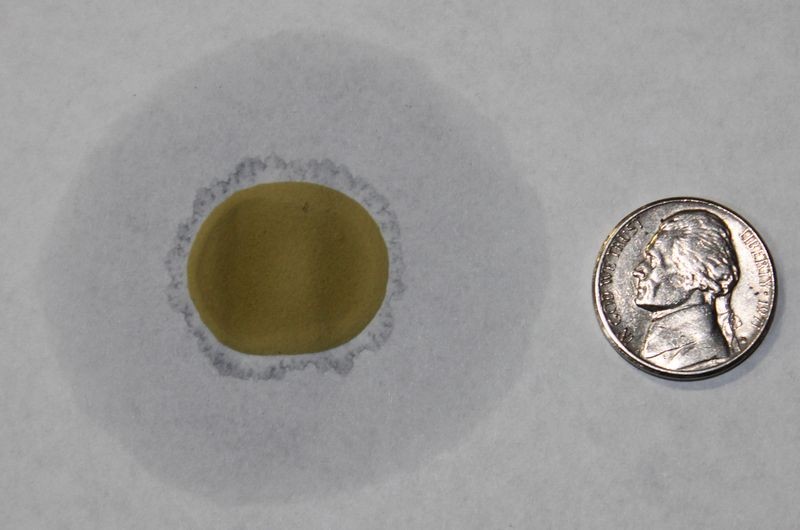
Paper Test for Capillary Action
If you place a few drops of #7 onto a piece of paper and then monitor it over a few days you will see the oils in the #7 migrate or seep away from the actual drop of product. It does this through capillary action and the same thing can work to your car's paints' advantage if it's a single stage lacquer or enamel paint.
I placed a few drops about the size of a nickel on a piece of standard printer paper around 3:00pm.

The next day I took these pictures at approximately 10:00am, (19 hours later), note how the oils in the drops of #7 have migrated outward via capillary action.
Feeder Oils penetrate or feed the paint
This same effect can take place in a single stage paint but not only will the oils travel horizontally, they will also travel vertically, that they will penetrate downward "into" your car's paint and this is where the term feeder oils comes from as the oils penetrate into or feed the paint. The result is they will condition the paint restoring some level of workability as compared to just working on old dry paint, and they will also bring out the full richness of color, something that will showcase the beauty of your car's paint.
So to bring this back to the idea of polishing a second time if you were using two products that both abrade the paint, this is done all the time for example using Wolfgang Total Swirl Remover which is a type of polish followed by Wolfgang Finishing Glaze which is type of "lighter" polish but it would not fit the definition of their non-abrasive, pure polishes.
BUT, everyone knows that following a the first polishing step with a lighter polish, (that abrades the paint even if just a little bit), does result in a nicer looking finish.
The the 4th Step, "Protection" or "Protecting" is their step for applying a coating of wax or paint sealant to lock in the shine and provide long lasting protection from the elements and anything that would come into contact to harm the paint.
I'm sure this has been asked many times so can someone send me a link to better understand what process should be taken? And should it be done every time? Again sorry I'm a detail oriented person that has to dissect everything. (that could be a good thing)
Great question actually, I'm not sure I've re-written for this forum my original "The 5-Step Paint Care Cycle" for this forum, it's always difficult to plagiarize myself.

In a nutshell,
The Multiple-Step Paint Care Cycle
Step 1 - Wash and dry the car
Step 2 - Inspect the paint for Above Surface Bonded Contaminants
Step 3 - If your physical inspection of the paint reveals a rough or textured surface then using detailing clay to clay the paint
Step 4 - Inspect the paint for swirls and scratches, if discovered then remove through polishing.
Step 5 - Remove swirls and scratches. If you have to use an aggressive product to remove the Below Surface Defects, then you'll want to do a second polishing step with a less aggressive product to maximize gloss and clarity and ensure no hazing from the aggressive step remains int the paint.
Step 6 - The second polishing step I just mentioned above
Step 7 - Protection - Apply a coat or two of your favorite wax or paint sealant.
Step 8 - Maintenance - This is where you use Spray Detailers and Spray-on Waxes to maintain the results you achieved by all the above in-between a normal car wash and a regular coat of wax or paint sealant.
Clear as mud?
How often to you repeat any of the steps above?
Simple, wash and dry the car, or use a waterless wash, rinseless wash, or spray detailer to get the paint clean and free from any loose dirt. The reason for this is because to figure out how often you have to do any of the above you have to INSPECT the paint.
- Inspect with your sense of touch to see if you need to clay the paint.
- Inspect visually with your eyes in bright light for swirls and scratches.
I have a very in-depth article on this in the works...
Mike Phillips
Active member
- Dec 5, 2022
- 51,004
- 7
- Thread starter
- #28
Mike, I just tried the Pinnacle Lotion today after M205 and thought it left the paint slicker than just the M205 alone. I did however do an IPA wipedown after M205 and prior to the lotion....was that a wasted step? I also did another IPA after the lotion...probably another wasted step. LSP was 845 FWIW.
Great questions.... sorry I missed this when you originally posted it... been kind of busy the last few months with behind the scenes projects and the work that goes into them... I touch on that here,
Autogeek's How-To Features on My Classic Car with Dennis Gage

Back to your questions... whether or not the IPA wipe-down steps were a waste of time or not depends upon the purpose behind them. If you're checking to make sure you've 100% removed the defects with your paint correction process, then probably not.
Some people wipe down each square inch of the paint and inspect 100% of all the paint as they work around the car. If you have confidence in your skill level, then theoretically, if you inspect your "Test Spot" and find you're process together with your skill and ability is removing all the defects, then theoretically, if you duplicate this process over the rest of the paint you'll continue getting the same results thus wiping and inspecting is not needed and just takes up more time and can dull or mar the paint.
If you're wiping the paint with IPA to remove any residual polishing oils so the wax or paint sealant will better bond to the paint then I have an article on this topic an each person has to decide for themselves the process they want to use...
Miscible and Immiscible - Wax and Paint Sealant Bonding
HeavyMetal
New member
- Dec 29, 2010
- 610
- 0
Mike,
I know it's not necessary, but I was planning on use WG PPE after TS and FG and before Menz Power Lock. I'm doing this on my wife Obsidian Black 2011 ES350. Figured that maybe the PPE would help hide any small defects I don't get and maybe make the paint pop a bit more. Plus I do get to play with the DA a little more.
Your thoughts on that? Will I accomplish anything other than playing?
I know it's not necessary, but I was planning on use WG PPE after TS and FG and before Menz Power Lock. I'm doing this on my wife Obsidian Black 2011 ES350. Figured that maybe the PPE would help hide any small defects I don't get and maybe make the paint pop a bit more. Plus I do get to play with the DA a little more
. Your thoughts on that? Will I accomplish anything other than playing?
James K
New member
- Dec 20, 2010
- 1,702
- 0
Our Pre-Wax Cleaner can be used with a DA. I'd suggest a polishing pad (a white Lake Country, which is what I use, as a point of reference).
We don't recommend Scratch Remover with a machine.
In both cases, there is a better choice in our consumer line for machine use - our 08616 Power Polish. It's made for use with a DA or rotary. Of course, AutoGeek stocks it:
Mothers Power Polish
Hope this helps.
I have used the power polish and really like the results I got from it using it as a paint cleaner. Good product IMO.
Mike Phillips
Active member
- Dec 5, 2022
- 51,004
- 7
- Thread starter
- #34
Your thoughts on that? Will I accomplish anything other than playing?
Mostly just playing because the Finishing Glaze finishes out so nicely...
Personally, I would go straight to wax after the FG. The Power Lock is a nice sealant once you get past the alien green color...
Mike Phillips
Active member
- Dec 5, 2022
- 51,004
- 7
- Thread starter
- #35
Sorry one more thing, I found Meguiar's Mirror Glaze 205 and Pinnacle Paintwork Cleansing Lotion. Are these products good to use after claying and before sealing? I'd like to the cleaner and polish in one step before doing the wax or sealant.:work:
The M205 is very light in it's cleaning or abrading ability but definitely more than Paintwork Cleansing Lotion, if you see any swirls, haziness, dullness at ail in the paint, go with the M205
Well having read this and thinking about it for a long while I'm at a loss. I plan on doing the steps but get confused with where in the scheme of things certain products get used and in what order. My plan is to wash, clay, use the new MF pads and polish for correction work followed by a MS wipe down then transition to Duragloss. With DG, my plan was to use the 501 marine as a cleaner followed by the 601 topped with 105 then AW. Is all this in the right order or should there be something added or deleted?
In the original posting I just couldn't find when dealing with sealants where the correction work came in and how to successfully transition when using 2 different product lines.
In the original posting I just couldn't find when dealing with sealants where the correction work came in and how to successfully transition when using 2 different product lines.
Mike Phillips
Active member
- Dec 5, 2022
- 51,004
- 7
- Thread starter
- #37
My plan is to wash, clay, use the new MF pads and polish for correction work followed by a MS wipe down then transition to Duragloss.
- Wash
- Clay if needed
- Correct with MF pads and MF 300 Compound
- Polish and Seal with MF pads and D301
If you're going to strip the D301 off with Mineral Spirits, (which is what you'll doing with the MS), then you're basically using the D301 as your light polish.
transition to Duragloss.
With DG, my plan was to use the 501 marine as a cleaner followed by the 601 topped with 105 then AW. Is all this in the right order or should there be something added or deleted?
In the original posting I just couldn't find when dealing with sealants where the correction work came in and how to successfully transition when using 2 different product lines.
You're making this harder than it has to be... after the correction and polishing steps, pick a wax or paint sealant you want to finish out with, apply it and your done.
You can apply more and more coats of different types of protection products but you're going to reach the point of diminishing returns. Plus anything with a cleaner in it applied to a finishing wax or sealant is going to remove it for the most part.
This would probably be better if it were it's own dedicated thread instead of tagging onto a "general" thread bout the benefits of using a light paint cleaner.
Mike Phillips
Active member
- Dec 5, 2022
- 51,004
- 7
- Thread starter
- #38
Well
In the original posting I just couldn't find when dealing with sealants where the correction work came in and how to successfully transition when using 2 different product lines.
Here's a portion of the original post, just to note it's about the benefits of using a light paint cleaner, not really a how to for the entire process, thus it was never intended to do as deep as I think you're looking for?
What they are
Paint Cleaners are typically liquid products that contain non-abrasive chemical cleaners and in some cases also mechanical abrasives of some type, suspended in a lubricating base.
What they do
Paint cleaners gently clean the surface and in so doing, remove any light oxidation, foreign impurities, surface staining, accumulated pore-embedding dirt and built-up road grime.
When to use them
Typically a paint cleaner is used before you apply your choice of wax or paint sealant. Specifically, a paint cleaner or pre-wax cleaner would be used after the car is washed and dried, and if the paint needs to be clayed, then after claying the paint with detailing clay but before applying a coat of wax or a paint sealant.
Order of Steps
- Wash and dry car.
- Inspect finish with your clean hand to check for above surface bonded contaminants.
- Clay paint - If above surface bonded contaminants are discovered then use detailing clay to clay paint, if paint is smooth an glassy feeling you can skip claying.
- Clean Paint – Use a Paint Cleaner to gently massage the paint and restore a clear, clean surface.
- Seal Paint – Use a premium quality wax or paint sealant.
Again, after you seal the paint, you're done. You can apply a second coat for these reasons,
1. Ensure a uniform coating over the entire surface.
2. Ensure a uniform appearance to your eyes.
3. To top one type of protection product with a different type of production product due to personal preference or to try to capture the benefits and features of two different products.
4. Personal preference because simply put you just want to do it.
2. Ensure a uniform appearance to your eyes.
3. To top one type of protection product with a different type of production product due to personal preference or to try to capture the benefits and features of two different products.
4. Personal preference because simply put you just want to do it.
You can call me if you like to discuss...
1-800-869-3011 x206
Mike Phillips said:This would probably be better if it were it's own dedicated thread instead of tagging onto a "general" thread bout the benefits of using a light paint cleaner.
Yes you are right and thanks for the response. I understand.
Mike Phillips
Active member
- Dec 5, 2022
- 51,004
- 7
- Thread starter
- #40
Yes you are right and thanks for the response. I understand.
Hey good talking to you on the phone...
Sounds like you have your plan of attack scienced out... :xyxthumbs:
As for the thread, no big deal, I was think it it was on the second page but after I posted I saw we were on page 4 so at some point it all becomes helpful information for everyone that reads this thread into the future...
Sometimes it is a good idea to start a dedicated thread for a specific car detailing project and then just add a link in your post to a thread that you have questions about.
I make it a practice to make the titles of all/most of my articles custom, blue clickable links and then anyone can highlight it and then copy and paste it like this,
How to share an article using a blue clickable link