Mike Phillips
Active member
- Dec 5, 2022
- 51,004
- 7
The LINE ---> How to avoid the line!
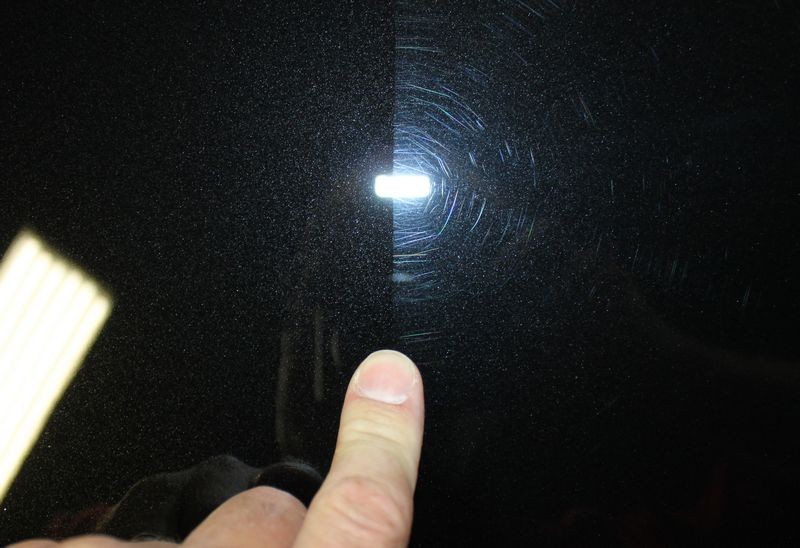
While using a tape-line works to show dramatic before and after differences you want to be careful because there's a downside to using a tape-line when ding a test spot.
The downside is if you buff DIRECTLY on top of the painter's tape you can leave a physical line in the paint that can be sometimes impossible to remove.
When I do these types of things for articles I'm trying to create a DRAMATIC "Before & After" picture showing the before and after results with a strong demarcation line.
Unless you "want" or "need" the picture then just buff close to the tape line, not directly on top of the tape line and you'll avoid creating a physical surface level difference in the paint that shows up as an actual "line" in the paint. (that can sometimes be hard to buff out).
Make sense?
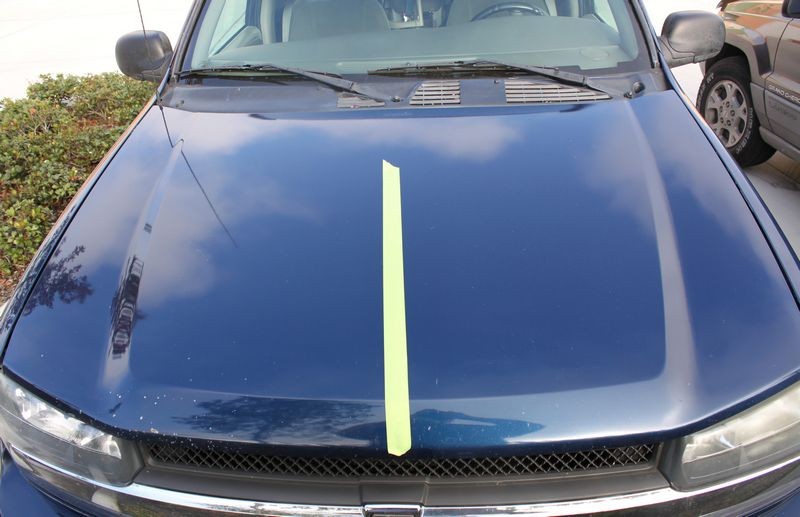
Here's an example of the kind of picture results you can get when using a tape-line for your test spot or any time you're trying to show others before and after results.
For example, I use a tape-line to showcase pads, product and tools on TV shows like Chasing Classic Cars, My Classic Car, Two Guys Garage and Motorhead Garage because in the TV world you have very limited time to get your message across, make an impact as well as leave a lasting impression with our audience.
Before and after demarcation line
You can get this type of dramatic before and after difference on neglected paint by using a strip of painter's tape on a body panel and then only buffing on one side of the tape.
If you don't know what a test spot is or why to do one, read my article here,
How To Do a Test Spot
(and why it's so important)
")
While using a tape-line works to show dramatic before and after differences you want to be careful because there's a downside to using a tape-line when ding a test spot.
The downside is if you buff DIRECTLY on top of the painter's tape you can leave a physical line in the paint that can be sometimes impossible to remove.
When I do these types of things for articles I'm trying to create a DRAMATIC "Before & After" picture showing the before and after results with a strong demarcation line.
Unless you "want" or "need" the picture then just buff close to the tape line, not directly on top of the tape line and you'll avoid creating a physical surface level difference in the paint that shows up as an actual "line" in the paint. (that can sometimes be hard to buff out).
Make sense?
Here's an example of the kind of picture results you can get when using a tape-line for your test spot or any time you're trying to show others before and after results.
For example, I use a tape-line to showcase pads, product and tools on TV shows like Chasing Classic Cars, My Classic Car, Two Guys Garage and Motorhead Garage because in the TV world you have very limited time to get your message across, make an impact as well as leave a lasting impression with our audience.
Before and after demarcation line
You can get this type of dramatic before and after difference on neglected paint by using a strip of painter's tape on a body panel and then only buffing on one side of the tape.
If you don't know what a test spot is or why to do one, read my article here,
How To Do a Test Spot
(and why it's so important)