Mike Phillips
Active member
- Dec 5, 2022
- 51,004
- 7
Two Types of Bird Dropping Etchings
Two Types of Bird Dropping Etchings
There are two common types of damage associated with bird dropping etchings;
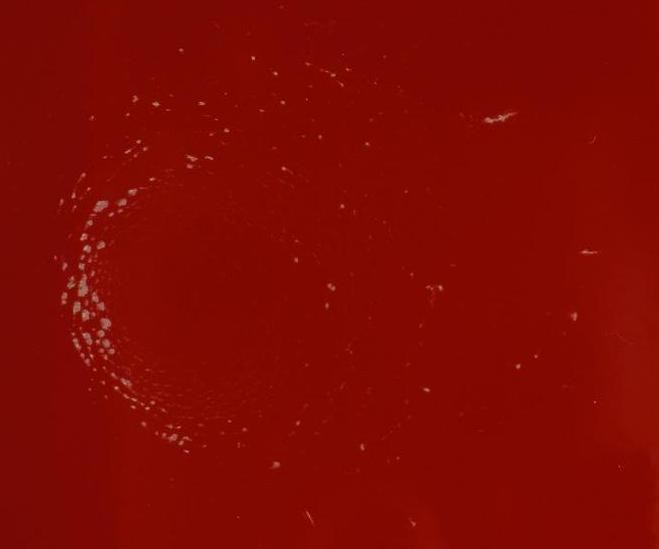
Type I Bird Dropping - Topical Stain Etching
Type I Topical Stain Etchings are usually only topical, that is shallow enough that they can be completely removed or at least greatly improved to the point where they are difficult to see.
This type of etching can be removed using a clear coat safe compound or polish by hand or machine. Hand removal is almost always more efficient as you can exert more pressure to a small area and thus keep your work area isolated to just the affected area. By machine you can use a Spot Repair System, again to keep the work area isolated to just the affected area.

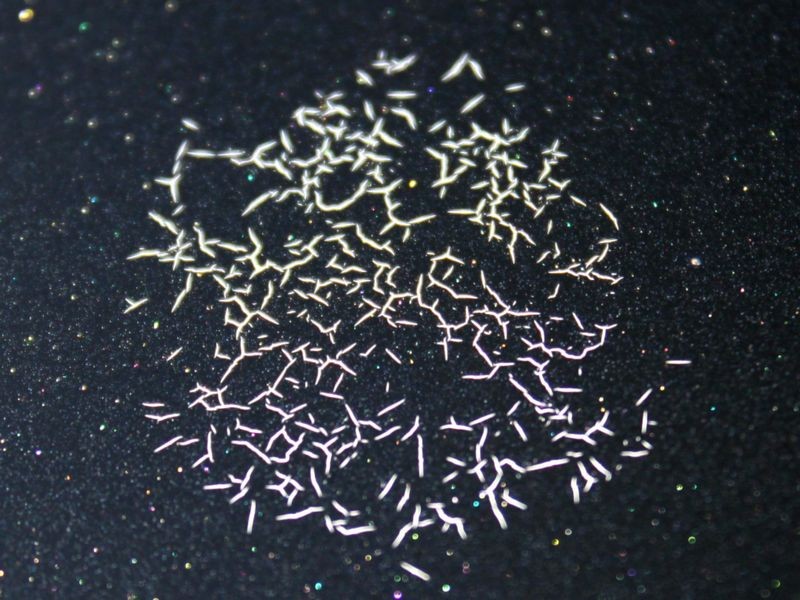
Type II Bird Dropping - Fractured/Wrinkled Etching
Type II Wrinkled Etchings are usually too deep to fix safely. The problem is the paint fractures, (splits apart in tiny lines,), or wrinkles as the paint swells and bunches together. In both instances, the resulting defect is throughout the clear layer of paint and not topical. Thus trying to remove it will require removing so much clear paint that you will likely expose the basecoat, or colored layer of paint which has a dull appearance. For this reason it's not safe to try to remove a Type II Bird Dropping Wrinkled or Fractured Etching.

Copyright ©PBMA - AutogeekOnline.net® All Rights Reserved
Two Types of Bird Dropping Etchings
- Type I Bird Dropping - Topical Stain Etching
- Type II Bird Dropping - Fractured/Wrinkled Etching
There are two common types of damage associated with bird dropping etchings;
Type I Bird Dropping - Topical Stain Etching
Type I Topical Stain Etchings are usually only topical, that is shallow enough that they can be completely removed or at least greatly improved to the point where they are difficult to see.
This type of etching can be removed using a clear coat safe compound or polish by hand or machine. Hand removal is almost always more efficient as you can exert more pressure to a small area and thus keep your work area isolated to just the affected area. By machine you can use a Spot Repair System, again to keep the work area isolated to just the affected area.
Type II Bird Dropping - Fractured/Wrinkled Etching
Type II Wrinkled Etchings are usually too deep to fix safely. The problem is the paint fractures, (splits apart in tiny lines,), or wrinkles as the paint swells and bunches together. In both instances, the resulting defect is throughout the clear layer of paint and not topical. Thus trying to remove it will require removing so much clear paint that you will likely expose the basecoat, or colored layer of paint which has a dull appearance. For this reason it's not safe to try to remove a Type II Bird Dropping Wrinkled or Fractured Etching.


")
 rops:
rops: