Best video ever on how to machine buff a car from start to finish

Joined
Dec 5, 2022
Messages
51,004
Reaction score
7
Best video ever on how to machine buff a car from start to finish


I've made a lot of videos in my life. Last summer Yancy and I made a brand new video series for our ROKU channel. After they were edited and placed on our ROKU channel I never got around to actually watching them. Last week I watched this video on exterior car detailing for the first time. In my my opinion, it's our best video ever on the topic of machine polishing and EVERYTHING related to machine polishing is included in the video.


Do me a favor please

Grab your favorite beverage, hot coffee, cold soda and expand the video to fill the entire screen and give it a watch and the if you would be so kind, reply to this thread with what you think about the content and presentation of the subject matter.


I also think this demonstrates Yancy's incredible skill as our "Creative Director". Nice work Yancy.


Thank you and enjoy.


:)
 
At work can't watch the whole thing now Mike but can't wait to see it when I get home.
 
Mike, I think it's an excellent video. It shows anyone the exact process/steps to achieve results on their own vehicle(s). It also shows that the PC is a perfectly capable machine!

Thanks for posting...I will be sharing this with some friends as well as some customers to show what goes into a 'detail'.


Regards,
Scott
 
Watched it yesterday, thought it was pretty cool. Liked "...the initial test spot not good enough, lets do another" concept illustrated. Looked wonderful cast to a 60" flat screen. At first I thought 'What they gonna polish and that perfectly shiny Chevelle?" but the closeups with the light really showed the defects.
 
I just watched this video and I always learn something new from Mike to continue to hone my skills, Mike and Yancy and its forum members help this small tight knit community learn from each other, Thank you Mike and Yancy for putting out a QUALITY product


Sent from my iPad using Autogeekonline mobile app
 
Awesome video Mike! Love how you use the 16x16 towel as a reference for your "working area", hadn't thought about doing that and that's a great trick to make sure you're not working too big of an area. Especially on a big hood like that one where you can just try to start stretching your work area because your mind tells you you'll get done quicker, when that's not the case. Keep the videos coming!
 
Watched the video a couple of times.

Content:
I appreciate you starting with the order of operation and not leaving out the significant step of clay prior to correcting. Your coverage of test spotting with less aggressive compounds/pads will help save lots of clear coat from unnecessarily being removed from cars around the world. Probably most impressive is your use of a tool that is affordable and useable by the masses and demonstrate how to use it effectively. I feel that a beginner could view this video, make a few purchases and effectively produce great results with very very minimal risk of causing undue damage.

Presentation:
You're ability to cover what many spend years learning in a 50 minute video is to be respected. The angles and close ups clearly demonstrate the process and practice you are showing. A careful viewer can even pick up on your subtle release of pressure as you transition on/off the curved portions to maintain consistent pad rotation.

I would love to show this video to a complete beginner and see how they did with no further instruction.

I am far from a great/qualified critic. But great job. Wish I had this video when I started.


Sent from my iPhone using Autogeekonline mobile app
 
This video is excellent! I feel that if someone is completely new to detailing (surface preparation) and watched this video, within no time they could perform all the steps, which have been laid out in a systematic approach to create a "work-flow".

I've always said, most difficult projects broken down into a systematic series of steps, then formulated and documented into a tried and true work-flow will yield results. This is such an example, but it's been done by the best in the business, Mike Phillips.

There are a lot of great videos on the How-To's section, but this one is by far the most in depth.

Mike, you keep things systematic, simple and create the work-flow! Bravo!
 
Watched it yesterday, thought it was pretty cool.

Liked

Thank you and thank you to everyone that "liked" it on our YouTube Channel.


the initial test spot not good enough, lets do another" concept illustrated.

I've been teaching the practice of doing a Test Spot in the forum world since March of 2004. I wrote about it back in 1993 or 1994 on Usenet Newsgroups in rec.autos.misc and of course I practiced it myself every time I detailed a car. I also implemented it at the very first Detailing 101 Class at Meguiar's in Irvine when I started up their Saturday Detailing 101 classes in July of 2002.


Here's what I know... it's easy to talk about doing a Test Spot. It's also easy to tell people to do a Test Spot.

Explaining it, showing it and at the same time capturing it in a way that the average person can see and understand the concept and practice is a completely different thing. Outside of some other older videos we've put out I've never seen anyone else explain and demonstrate how to do a Test Spot. This is just one of the reasons I like this video and think it will help anyone new to machine polishing or wondering exactly how and why to do a Test Spot.


Looked wonderful cast to a 60" flat screen. At first I thought 'What they gonna polish and that perfectly shiny Chevelle?" but the closeups with the light really showed the defects.

The condition of the paint shown in the video was the true condition. So was the gunk that came off onto the clay.


For what it's worth... I make it a practice to always get great pictures of the condition of the car when it arrives to Autogeek. I know it can look like a car is in great condition without proper lighting and too many people are so cynical now days that it's just a good practice to document everything.


Thank you for your feedback.


:dblthumb2:
 
I very much enjoyed this video!

It's in your classic style of presentation, thorough, complete, and informative. Absolutely a winner!

Thanks for making it!
 
Watched this video a few days ago was a nice update. I especially enjoyed the surface coating video you did Mike.
 
Mike that was a great video. Yes, Yancy did a great job. How long did it take to shoot this video up to the end of your test spot?
 
I liked the video. It is high quality and did a great job of showing the steps involved in polishing a car from start to finish. I think this is a good video for beginners to learn the process of polishing.
 
Mike that was a great video. Yes, Yancy did a great job.

On behalf of Yancy and the team here at AG - thank you.


How long did it take to shoot this video up to the end of your test spot?

We were under pressure to pump out 9 videos as part of a Detailing 101 class (online), that includes 9 written tests over the subject matter.

We filmed all 9 videos in 2 1/2 days. Believe it or not that's working very fast. Some of the videos were done in one take. That saves editing time.

For comparison, when Bob McKee and I flew out to California to shoot two thirty second TV commercials we shot them in two days, one day for each commercial and each commercial took approximately 12 hours.

So I think 9 long, in-depth videos in 2.5 days compared to 2 - 30 second commercials in 2 12 hour days is pretty good.


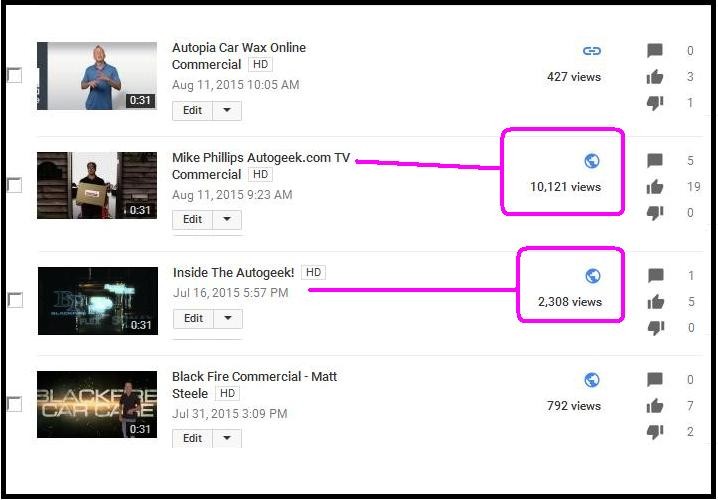
Here's the 30 second commercials in case you've never seen them on TV. The second commercial is the one where I fell and broke my leg.


Here's the two 30 second TV commercials,


Out of curiosity, I checked the stats for the above two TV commercials and there's also two there for Matt Steele


AG_TV_coms.jpg


To answer your question about how long did it take to get from the start of the video to the end of the test spot? Probably about an hour or so...


:)
 
That is truly the "best" video I have ever seen and covers every important aspect of each step. Absolutely outstanding!

From your initial post above, Mike, i gathered you also wanted some constructive comments so let me just mention a couple. Bear in mind I already knew just about everything you mentioned but I watched the vid with a mindset of someone who has never done this before and will tackle it solely based on this video.

You used a 2 step approach with an initial compound followed by a refining polish. After your second test spot (more aggressive compound and pad) the paint looks phenomenal. Some may see those results and figure " hey, that got 'em...why does he need a finish polish? ". Because a compound, while effective at cutting, typically doesn't complete the paint flattening and leaves behind what the final polish cleans up. You didn't really explain that but go onto the finish polish step which is an assumption anyway. Again, Mike, just noticed a question that someone who's never done this may ask.

The only other thing I do from studying you over the years is I am a shake-a-holic. I shake every bottle of product i use every single time i grab it! No lie. I now shake shampoo, ketchup, salad dressings, shave cream etc. because I am in that habit. I thought you might mention that but again, no biggie.

Both of my comments won't screw something up if omitted from your incredibally comprehensive video. I certainly don't think for even a second I could do anything nearly as good as The Master however simply offer my thoughts on what a noob might ask or see. Thank you and Yancy for working on that and putting it up so potentially millions can see the exact right way to do it! It truly is "the BEST video ever" on this topic and I'm proud it's right here on Autogeek.
 
thank you, mike and yancy for the great video. no one can even come close... you
guys R O C K I N T H E U S A !!!!!!
 
Great video Mike and Yancy. You should make a DVD of this and include it in every buffer kit package even though it shows the Porter Cable it applies to the basics with all machines. I like how you don't need a teleprompter because you are the master and just talk off the cuff about what you know best. Also I think your sales would increase dramatically because a lot of new detailers would see what steps and products they are either missing or need to get the results they are looking for. Bravo to Autogeek.
 
Great video as all of your videos are and I even love your book. Thanks for all the help over the years
Rock solid information from a true master..
 
Mike, Do you normally wear Nitrile gloves when detailing? I would think you hands would be a mess from using all those different products. Mine dry out and crack.
 
Back
Top