Just arrived to work, saw this last night after the Mustang wetsand, cut and buff project but it was already late...
So let's start here....
The next week the client pulled me to the side and pointed out tons of holograms in the sun and insisted we did it.
Not so much for you Anthony but for everyone that will click on this thread and read this into the future...
Here's my article on the topic of Holograms versus DA Haze,
The difference between Rotary Buffer Swirls, Cobweb Swirls, Micro-Marring, DA Haze & Tick Marks
Lets take a look at the different types of swirls.
Rotary Buffer Swirls
Also called: Holograms or Buffer Trails
Rotary Buffer Swirls, also called
Holograms or
Buffer Trails are circular scratches inflicted into paint by a rotary buffer and usually by the individual fibers that make up a wool cutting or polishing pad. The abrasives used in most compounds and polishes can also inflict swirls into a car's finish, thus anytime you're using a wool buffing pad
and a compound or polish you now have two things potentially inflicting swirls into the paint.
Foam pads can also inflict rotary buffer swirls into paint depending upon the aggressiveness of the foam formula and the product used.
It is the direct drive
rotating action of a rotary buffer that instills the
circular pattern of scratches into paint usually in some type of zig-zag pattern that mimics the pattern in which the buffer was moved over the paint by the technician.
A rotary buffer is not evil because it and the buffing pads and compounds used with it impart swirls into paint, it's just a part of the
cause and effect from using a direct drive tool that rotates a buffing pad in a
single rotating direction.
Rotary Buffer Swirls usually show up when a car is exposed to bright light like the sun when its high overhead in the sky.
It's possible to use a rotary buffer and not instill rotary buffer swirl if the operator has a high skill level and uses quality pads and products. If rotary buffer swirls are instilled into paint, a true professional will do a follow-up process to remove them using less aggressive pads and products and sometimes switch to a different type of tool with a different mechanical polishing action.
The primary
visual difference between Rotary Buffer Swirls and Cobweb Swirls is the rotary buffer imparts this identifiable pattern while Cobweb Swirls do not.
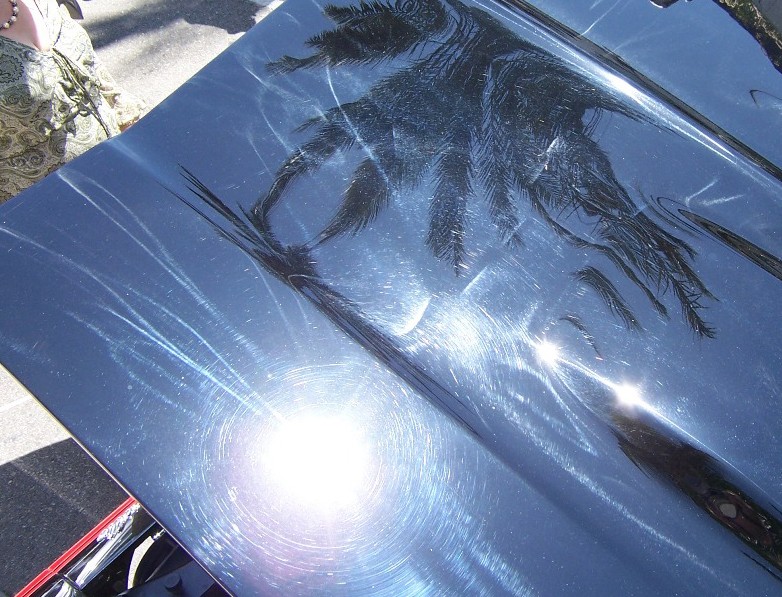
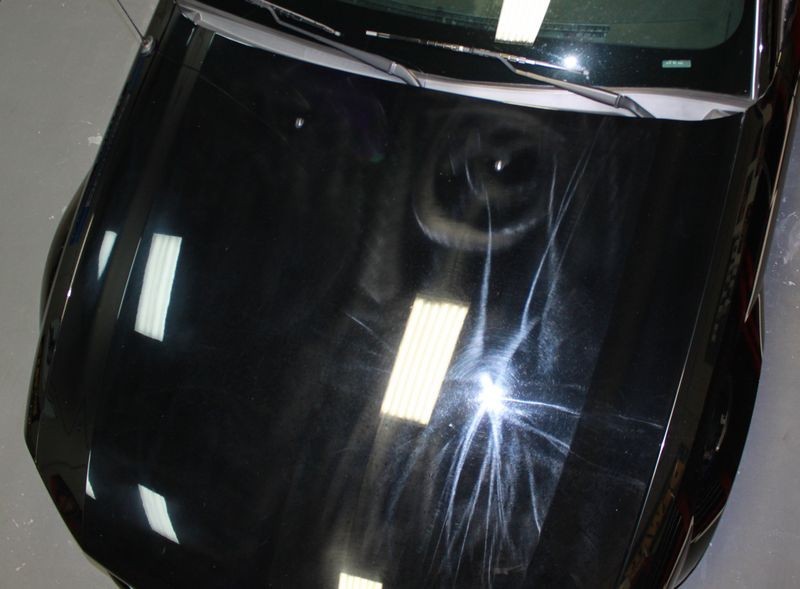
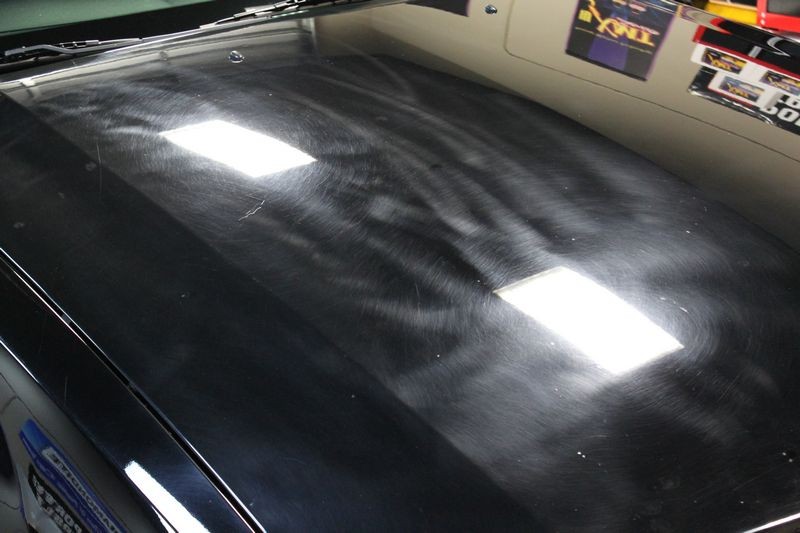
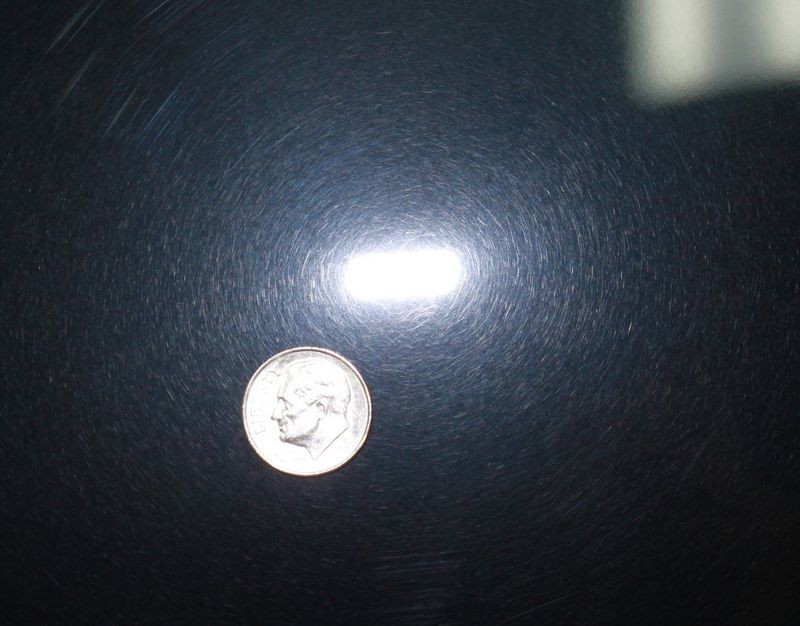
Examples of Rotary Buffer Swirls
The zillions of swirls in the clear layer makes the paint look hazy and blocks your view of the black paint under the clear top coat. This reduces the darkness of the paint making the true black look gray.
Here are some more examples of holograms from a rotary buffer from this article...
The Blindfolded Detailer Wheels Another Car!
Let me wheel your car!
So Rotary Buffers impart a VERY distinguishable type of swirl pattern.
Micro-Marring - Tick-Marks - DA-Haze
These three terms are pretty much the accepted terms for a scratch pattern left in some paints from the oscillating and rotating action from a compound or polish and a buffing pad when applied using a
DA Polisher.
Unlike Cobweb swirls or Rotary Buffer Swirls, the scratch pattern instilled by a dual action polisher is made up of millions of tiny scratches, some are curved or circular but some are straight, like a small tick mark you would make with a pencil if you were keeping track of a count of some type.
Tick Marks are a sign that either the paint is on the soft side, so easily scratched or the pad and compound or polish you're using are too aggressive to finish out without leaving a mark.
In most cases Tick Marks can be removed by re-polishing with a different pad and product combination.
Now follow me on this...
A DA Polisher, which is what a Cyclo Polisher is, can leave trails mimicking the pattern or direction the polisher was moved over the paint, these are trails of haze, not actual scratches inflicted like a rotary buffer will inflict as shown in the pictures above.
If the swirls you're seeing in this black Ford F650, (which is a MONSTER of a truck), look like the rotary buffer swirls then you did not do it.
IF the swirls look like a pattern of haze in the paint then you likely did do it and my guess is the paint is
incredibly soft.
Just the other day, I decided to go ahead and compound, polish, and wax (M105, M205, and Collinite to top off). Well, used light cutting pads and M105 and Holograms were ten times worse! Topped it with M205 and white pads and holograms were still bad :/!?!?!? Wow - I use the Cyclo to remove holograms.... its inducing them on this ride!
M105 and M205 are very good products as everyone knows. If these types of SMAT products are leaving micro-marring in the paint no matter what the tool, chances are very good you're dealing with some very soft paint that scratches very easily.
When M205 first came out I used it with a Porter Cable and a polishing pad to do a test spot to remove swirls out of a black Tahoe that had been repainted and it left micro-marring on the repainted panel but not on the factory paint.
So what this reinforced to me at the time was that not all abrasive technology works perfect 100% of the time on all paint systems.
This is why as a professional detailer you need to have a good selection of tools in your tool chest and be able to adjust your process on the fly to the paint you're working on.
would you be able to get any pics? What sort of marring/holograms are they exactly? They cant look like rotary induced holograms right?
I agree. I would really like to see the side of this Ford lit up by the sun and then some really good pictures like I've posted of holograms above so everyone can see what Anthony is seeing.
Yes - they look like rotary induced holograms - only induced with a da!?!?!?!
Holograms are created by heat right?
No... holograms are scratches and they are caused by the abrasives being moved over the paint surface.
Just to note,
heat is an unwanted by-product in the buffing process. I talked about this in the
1965 Mustang Wetsanding video last night.
This is really puzzling. Maybe try a new polish? Give menz SF4000 on a red/black pad a shot. To my knowledge Megs 105/205 are SMAT, maybe a DAT polish like Menz might finish out better.
I agree.
The first thing I would do is place a tape-line on a large flat panel like the door and then buff on just one side of the tape line using a Porter Cable "type" of polisher, that is a PC, a GG or a Megs DA Polisher.
Use a Lake Country 5.5" Flat Foam White Polishing pad with a Medium Cut Polish like the SI 1500 on speed 6 for about 6 Section Passes.
Wipe off residue and inspect. At this point paint should look pretty good.
Re-polish again using a Lake Country 5.5" Black Finishing Pad and SF 4000 or SF 4500 on speed 6 to start with and then maybe slower down a little and reduce pressure for the last few passes with a little faster arm speed.
Wipe of residue and inspect. At this point paint should look flawless.
If the above does't fix the problem then I would say the paint is incredibly soft and I would try a rotary buffer at slow speeds with the last combo listed above and then inspect.
The demo hoods and trunk lids I have for my classes have fairly soft paint, at least more on the soft side than the hard side and I use these to judge the quality of any abrasive product that comes through the door.
I can finish out perfect on the panels using good abrasive technology. To date, Menzerna polish have never failed to create a flawless finish on these panels.
So Anthony, if you have some of the above please give it a try using the tape-line approach because buffing on just one side of a tape-line will make it real easy to visually inspect your process and gauge and compare our results, either good or bad against the current condition of the paint you're starting with.
If you don't have the above products... I'd recommend getting some of them because it's a good practice to have a variety of tools in your tool chest so you can pick, choose and use the product that work best for the paint system you're working on.
Please keep us updated...
")


 rops:
rops: