DFB's Garage

I love Jag's, sadly I suspect the brand's days are numbered. I can see a day where Tata close down the Jaguar brand, while continuing the more popular Landrover/Range Rover brand. Such a shame, the current range of Jaguar's drive so well, to the point where I believe they drive better than the equivalent BMW's which have traded certain chassis and engine traits in the pursuit a wider audience.

Ive heard many times that landrover/range rovers are just overpriced ford suvs and that they dont last for shitt past 60,000miles or so. I dont know how true and of this is.

Sent from my SM-S901U using Tapatalk
 
Ive heard many times that landrover/range rovers are just overpriced ford suvs and that they dont last for shitt past 60,000miles or so. I dont know how true and of this is.

Sent from my SM-S901U using Tapatalk

Perhaps in the past, but Jaguar-Landrover (JLR) have been owned by TATA since 2008, so Ford's influence is long gone.
 
Ive heard many times that landrover/range rovers are just overpriced ford suvs and that they dont last for shitt past 60,000miles or so. I dont know how true and of this is.

Sent from my SM-S901U using Tapatalk
I currently work for a company that specialises in servicing Land Rover/ Range Rover, but mostly 5 years and older. Simply put, they just aren't reliable. While the Service Manager and Workshop Manager drive them, none of the mechanics do, that should tell you something, most of them drive Japanese brands.

Sent from my motorola edge 20 fusion using Tapatalk

My father's business partner has thing for Range Rovers, the higher end Vogue and not the Sport. ALL, and I mean ALL have been absolute dogs.

His current one is from the recently superseded model, it's arguably been the worst of them all, in and out of the dealer constantly from new. Always something electronic or suspension related. I don't know how he tolerates it to be honest, it would drive me insane. He must really love them, and I can understand that because they are absolutely beautiful to look at, sit in and ride in. When they are working, they are one of the most majestic vehicles on the road.
 
When I was cleaning the 028 yesterday, the Surfex removed the remaining orange colouring on the recoil cover badge. These painted aluminum badges have a habit of doing this, so I'm not entirely surprised or concerned.


It does however look a little naked without the orange colouring, so last night I managed to track down a new-old-stock replacement, which I will install once I get the saw back from the Stihl dealer.


There are a couple of versions of these badges, some say "Made in America", some say "Made in Germany" and some have nothing other than "STIHL". The original on mine only had the "STIHL" lettering, however I could only find the "Made in Germany" version.

Either way, just a little detail that will put a finishing touch on this project.

I may also touch up the black STIHL lettering on the sprocket cover, again the lack of colour contrast looks out of place.

 
Holiday Project Three - Refurbishing a Briggs & Stratton Carburetor

This is another one of those "one day" jobs. And since I not only burnt the bridge leading to my usual small engine workshop, but I also blew it up with several grenades, I have to do these jobs myself now. :laughing: (They deserved it by the way, I don't tolerate fools gladly)

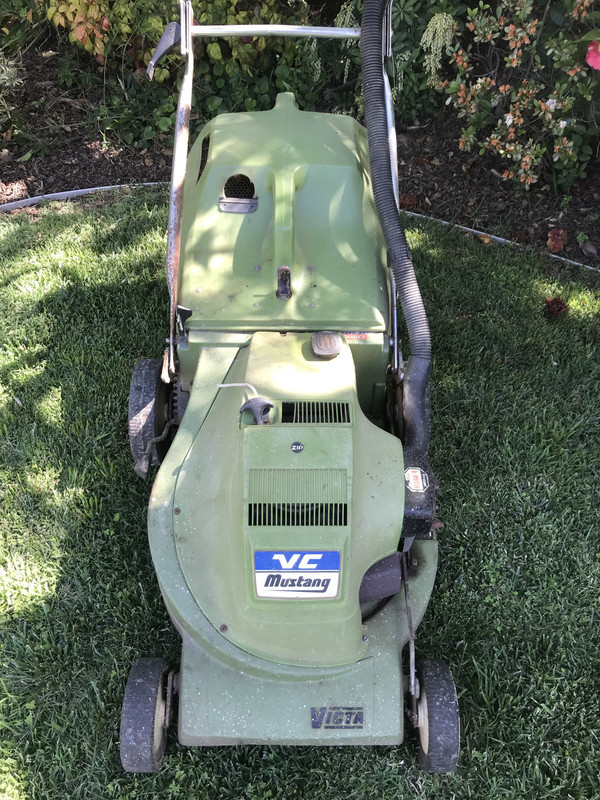
Not that I'm complaining, because this is a labor of love with this machine. This mower got me started as a young teenager mowing lawns that would later grow into a professional business. I landed a job mowing lawns for one the richest families in the country with this machine and I practically run the thing into the ground over a number of years. These days, it sits in the garden shed for sentimental reasons, coming out occasionally to mow my own lawns. It really needs a new set of rings, it visibly burns oil and the chassis has been patched back together in a few key places. But I don't care, it's not going anywhere. The rings will have to wait for another day, it clears up as the engine warms up. The carby though had been showing signs of it needing attention sooner rather than later.


I'm not going to lie, I was a touch daunted by this project. These 3.5 - 4.0 hp Briggs & Stratton engines are fitted with a diaphragm type carburetor, and have done so from the earliest beginnings of this engine design, right up until they discontinued them in the mid 2010's. Over time, the thin plastic diaphragm loses it's ability to pulsate fuel up into the carburetor, causing a variety of issues including hard starting, rev surge and reduced performance. Mine was showing the beginnings of trouble, it started just fine but would occasionally stumble and then surge. The fact that it lasted over 22 years without issue astounds me. So, with time on my hands, I wanted to learn how to replace this part myself.

This job required some forward planning in terms of ordering the correct parts ahead of time. Again, that burnt bridge meant I couldn't just go and get them from the dealer. In this case, I ordered the diaphragm and gasket set, along with a new set of governor springs, more on that later. I also wanted to replace the primer bulb, but to be honest, it was working just so I decided to just leave that alone.


These engines are incredibly simple to work on, all the bolts have easy access and really, a few simple tools are all you need to do pretty much everything on them. Having said that, I'm loving the access to a full set of tools working on these machines, it just makes everything flow so much easier. Investing in a tool set was something I wish I had done a long time ago, having everything in the one spot and ready to grab and go is priceless.

First step, remove the air cleaner. Again, this is a part that was largely unchanged in 50 years they made these engines, mine being made from steel rather the later plastic ones. (Side note - this Sprint 375 was made in the USA before they moved production to China. The side-valve Briggs were cheap engines made cheaply, the Chinese made ones are even cheaper made with thinner castings and more plastic.)

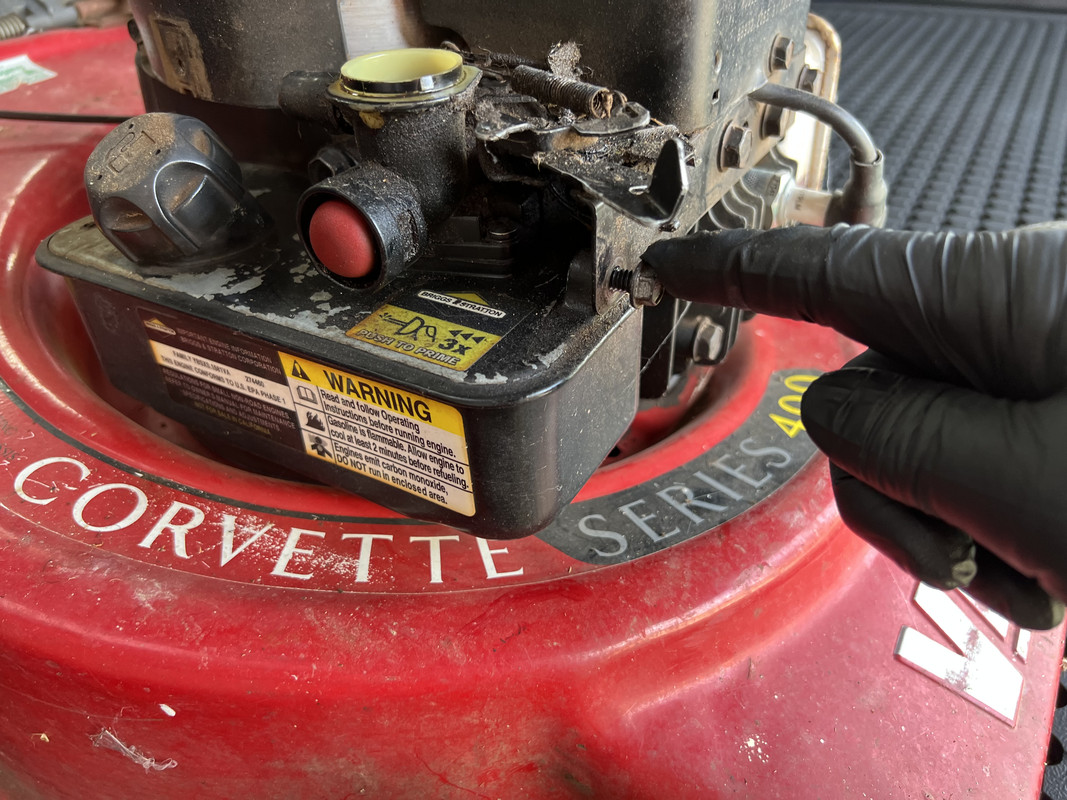
This is what 22 years worth of hard work looks like, I'll never live it down! :doh:


With the air cleaner housing out of the way, remove the throttle cable from linkage, remove the cable bracket and then remove the two bolts holding the fuel tank to the engine. Again, another design that stayed the same all the way through production, this steel tank will fit on an older engine no problem and vice versa.


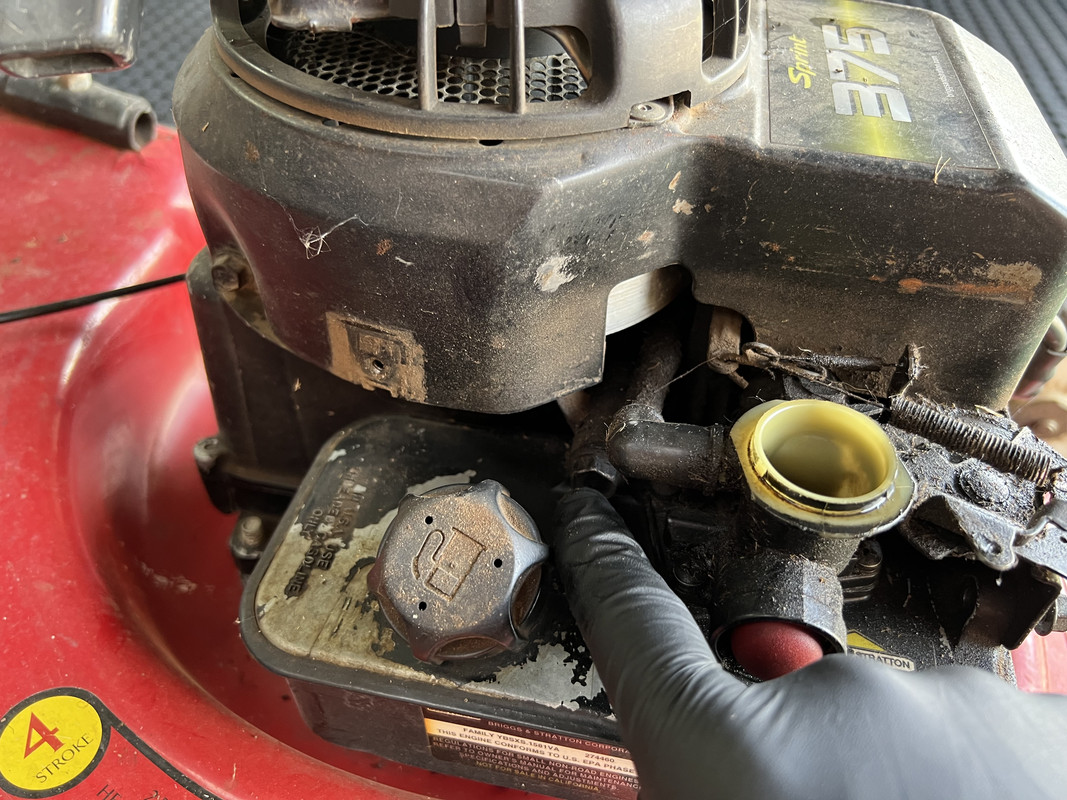
The next step is a bit of a wrangle, you need to gently wiggle the carb off the intake manifold and breather tube while unhooking the governor linkage attached to the throttle plate. Make sure to then remove the intake washer and gromet for safe keeping. No pics of this step, it's kinda a two-handed job not conductive to holding a camera.


Tank removed. The reason for removing the whole tank from the engine is it permits proper access to the bolts holding the carb to the tank and improves the re-installation of the new gaskets. You really can't do this job with the tank installed.


I also chose to remove the pressed tin recoil cover, the later Chinese engines had a plastic shroud covering this part, necessitating the removal of two parts rather than one. :doh I suspect this was as much about making the engine look more modern than it really was.


I removed this cover to inspect the cylinder fins as well as making sure the intake manifold was correctly secured to the intake port, these engines have a habit of backing the bolts out over time. Mine was fine.


It was then time for some more cleaning, and I have to say, I was a little sick of messing about with yukky oil covered parts by now. :(

First step was to remove the carb from the tank.


I then drained the fuel from the tank. As you can see, she was a bit grotty in there, necessitating a flush out a few times.


I then cleaned the carb and tank as thoroughly as I could, using lashing of carb cleaner along the way. This was the first time I had used such a product, and yes, it's good stuff. I also removed and cleaned the metal pickup screen, likewise the return tube as it was partially blocked. Other ancillary parts including the breather tube and carb bolts were also cleaned during this step.


This was the state of the old diaphragm, with the gasket fused to it over time. Certainly not terrible, it was still somewhat pliable, but I could see where it was starting to wear.


This is the part I was dreading, putting the new parts on the tank and aligning the carb and screws altogether.................but I aced it first go! Im the MAN


Important to note that the diaphragm goes on first, the gasket sitting on top sandwiching the diaphragm between the tank, gasket and carb. Locate the screws loosely at first and then work diagonally to torque them down, helping to prevent warping of the plastic carby.


Next, I used compressed air to roughly remove the build up of oil and dirt from the engine overall, plugging up the intake manifold for safety. I then decided to install the new governor springs.


These springs control the speed of the engine, more to the point, they prevent it from revving too hard and therefore preventing a thrown rod. Over time, these springs lose tension and actually prevent the engine from running at the permitted full speed. Replacement while I was in there seemed like a good idea. While I took photos of the correct placement, I just replaced each spring one at a time so that I could keep track of what went where. In this case, I simply cut the old springs off and looped the new ones in.


It was then time for the recoil cover to be reinstalled, followed by the carb and tank which is again a process of wrangling the tank back into place, hooking up the governor linkage and pushing the carb onto the intake tube. Be sure to have reinstalled the intake o-ring and grommet like this little black duck forgot to do! :doh: Reinstall the breather tube and air filter now as well.


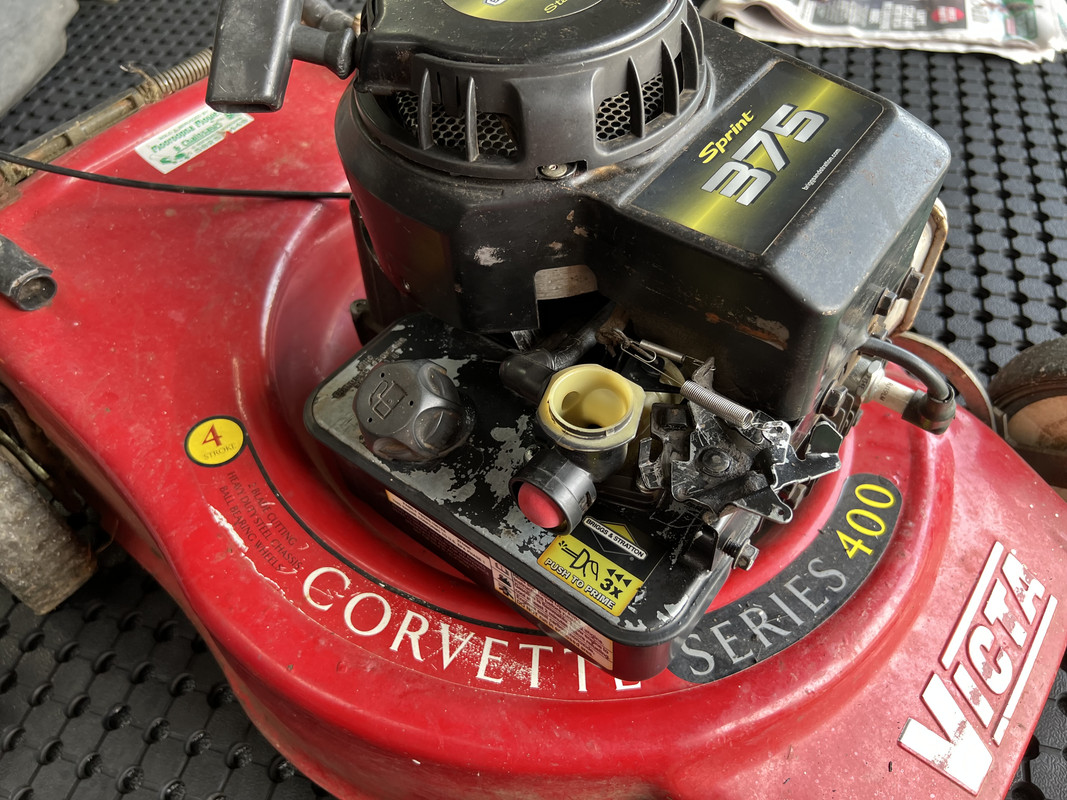
I then reinstalled the throttle linkages. I actually had to make an adjustment to fix a long-term issue with the kill switch, the cable not pushing the throttle plate forward enough to make contact with the switch. Another little issue finally fixed!

With the engine all back together, it was time to fill the tank with fresh fuel and fire it up. A few pushes of the primer and two pulls on the rope and the engine burst into life. The smile on my face was epic at this point, I DID IT!! Im the MAN

With the new diaphragm and governor springs, the engine was running STRONG, a little too strong to be fair. So, off with the air cleaner again and few small adjustments to the governor tab with needle nosed pliers, bringing the engine speed down to a more appropriate level, verified with my new digital tachometer.

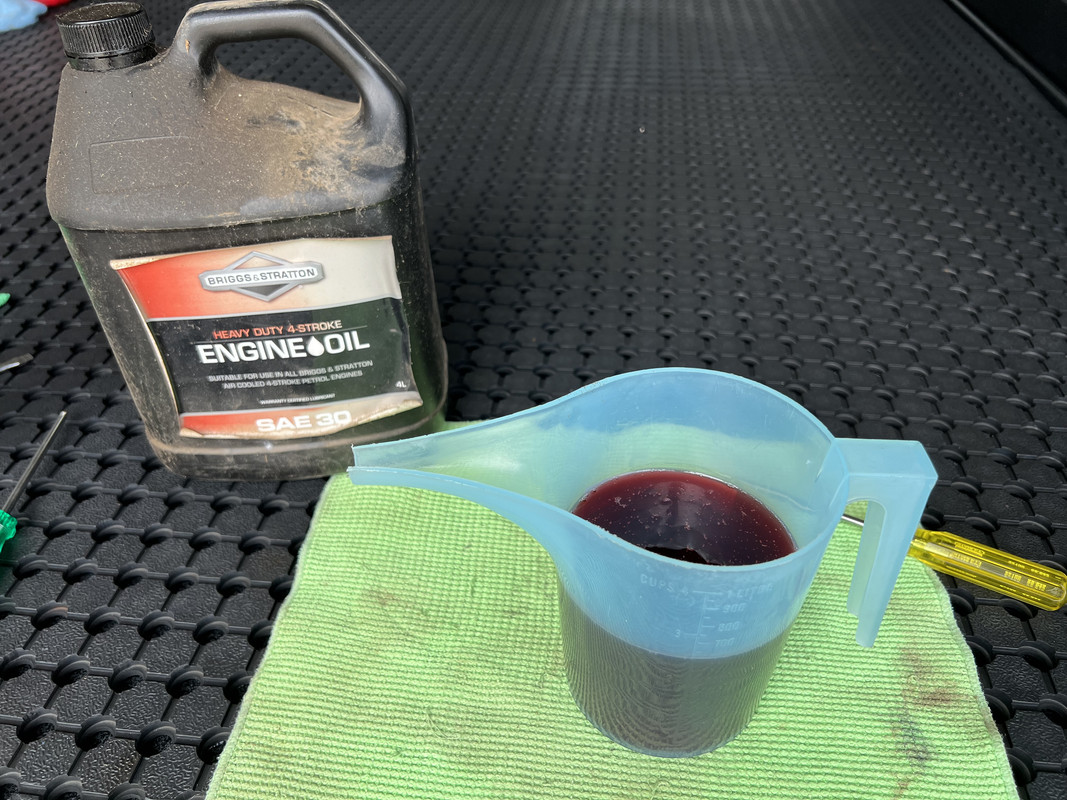
Once warmed up, I then changed the oil. I typically use Penrite Small Engine Synthetic 10W-30 in my 4-stokes, however I consciously stick with SAE30 for this aging engine. This is a monograde mineral oil that has been used for decades by Briggs, probably specified to account for their wide tolerances.


One last mechanical thing to take care of was re-torquing the head bolts to 13.75 ft lbs, the ones on the exhaust side of the engine have a habit of backing out over time.

A quick clean and lashings of Meguiar's Hyper Dressing and the old Victa is looking and running much better. (See, there is something detailing related)


The worst part of this job, like the chainsaw, was the cleaning. It's a messy, smelly job that just sucks. But the satisfaction of putting clean, new parts back onto the engine was very rewarding, and having it fire up and run like new was even better. Not to mention acing a job I had been frightened of doing myself! Im the MAN
 
Amazing job on that Corvette mower but I think I like the body lines of a 66 Corvette better. :)
 
Amazing job on that Corvette mower but I think I like the body lines of a 66 Corvette better. :)

I'm more of a Mustang sort of guy myself.......................:xyxthumbs:


And sometimes I like to go Commando.........................:laughing:

 
Ok, back to detailing.

I noticed the Mustang had picked up some sort of funk on the glass, so an impromptu rinse-less wash followed.

The car was otherwise clean, so I decided to try out my new TRC Ultra Black Sponge.


I cannot even remember the last time I used a "sponge" to clean a car, so you can imagine I was hesitant to use this thing. The Ultra Black Sponge (UBS) was designed with rinse-less washing in mind but can also be used with more traditional bucket and soap washing too. The sponge has laser cut grooves on both sides, creating a multitude of square "fingers". The actual sponge material is unlike any regular sponge available for a couple of dollars at a chain store, being extremely smooth dense.


Today, I teamed the UBS with P&S Absolute. One thing I have noticed with Absolute is that it will mix better when added to warm rather than cold water in the bucket, eliminating the "clumping" that can occur with this product.


Typically, I use the multiple towel method when rinse-less washing, the fact a dirty towel never re-enters the bucket means your wash solution stays clean. The UBS is used like any other wash mitt or pad, you dunk the sponge into the bucket, wring it out until just dripping and then make your passes across the paint. You then rinse out the sponge in the bucket, against the grit guard if required, and then start the next section.

I then followed up with Bead Maker while I dried the car. Brilliant combination and super user friendly.


Like rinse-less washing in general, I would probably pick my mark with the UBS. Overall, I actually liked using the UBS, certainly departure for me in terms of both soap washing and rinse-less washing. It also removes a lot of hassle in regard to towel management.
 
I currently work for a company that specialises in servicing Land Rover/ Range Rover, but mostly 5 years and older. Simply put, they just aren't reliable. While the Service Manager and Workshop Manager drive them, none of the mechanics do, that should tell you something, most of them drive Japanese brands.

Sent from my motorola edge 20 fusion using Tapatalk

Same job as before or new one?


Sent from my iPhone using Tapatalk
 
Same job as before or new one?


Sent from my iPhone using Tapatalk
Same job, but I finish up on Tuesday, I need a break, and a change. I've given them over 14 months, they're not going to change the things that need to change, which they said they wanted to, and the guy that hired me left months ago too.

Sent from my motorola edge 20 fusion using Tapatalk
 
Same job, but I finish up on Tuesday, I need a break, and a change. I've given them over 14 months, they're not going to change the things that need to change, which they said they wanted to, and the guy that hired me left months ago too.

Sent from my motorola edge 20 fusion using Tapatalk

I know the sort, talk big about changes/improvements/taking on suggestions and then just keep doing what has always been done because that's all they care to know.................and then complain about staff turnover or lack of engagement.
 
I know the sort, talk big about changes/improvements/taking on suggestions and then just keep doing what has always been done because that's all they care to know.................and then complain about staff turnover or lack of engagement.

We had a local restaurant put a note on the door to be patient because people would rather stay home watching Netflix than work, which didn’t go over well. Considering as how my son worked for them previously, the reality is they don’t pay enough or treat their employees well enough and that’s why they have high turnover. But why take the blame when you can blame anything else but incompetence.
 
We had a local restaurant put a note on the door to be patient because people would rather stay home watching Netflix than work, which didn’t go over well. Considering as how my son worked for them previously, the reality is they don’t pay enough or treat their employees well enough and that’s why they have high turnover. But why take the blame when you can blame anything else but incompetence.

Much blame gets pointed at the younger "entitled generation" but there is also a sense of entitlement with employers as well.

In that I mean "I pay you a wage, so you will do anything I tell you" or "I'm the boss, I'm allowed to act like ass-h.le" type mentality. And yes, an employee is there to serve a purpose, but that type of sentiment just creates an us versus them mentality. If you don't include and encourage your employees, then you end up with a disengaged and sour workforce and a higher turnover rate.

What I’ve noticed at various customer-facing businesses is that the employees aren’t getting trained, walking into a place and getting ignored for a couple minutes isn’t the way to do it even if they’re busy. Acknowledge the customer and let them know you’ll be with them in a moment. We could blame the younger generation as they’re used to burying themselves in a phone but the business should train them on proper customer service but since the managers usually don’t know good customer service…
 
What I’ve noticed at various customer-facing businesses is that the employees aren’t getting trained, walking into a place and getting ignored for a couple minutes isn’t the way to do it even if they’re busy. Acknowledge the customer and let them know you’ll be with them in a moment. We could blame the younger generation as they’re used to burying themselves in a phone but the business should train them on proper customer service but since the managers usually don’t know good customer service…

Because unfortunately most of them aren’t paid a decent living wage. So they “quiet quit”. Hard with the economy they way it is 50k will no longer due.


Sent from my iPhone using Tapatalk
 
Deyon, loved the Corvette lawn mower

Sent from my SM-G991U using Tapatalk
 
Holiday Project Four - Decontamination, Polishing & Coating the Wildtrack

It's funny how a wax, sealant or coating "tells you" when it's about done. The Collinite 845 I applied just under 12 months ago, and maintained with several spray sealants, has given its best by now. I have been putting this job off until I had the time to do it properly. It's also been on two long road trips in the last two weeks, so with those out of the way, it was time to get it back into shape, or DFB Spec. Although, having said that, this is not a car I am invested in, so it won't quite be full-DFB spec. I say that, and then usually get carried away, so let's see how that pans out. :laughing:

A large part of this job will be the decontamination process, exaggerated by the generous peppering of bug splatter picked up over the last two weeks............


I started with cleaning the wheels as usual, Brake Buster from the foam cannon, using Undressed for the tyres.


With the wheels taken care of, it was onto those bugs. In this case, I pre-soaked them with Koch Chemie Insect Remover followed by foaming the entire car down with soap to dwell for several minutes.


Usually, by the time I have rinsed out my wheel cleaning tools and bucket, it's time to rinse the soap off. This process removed the bulk of the bugs and road film prior to re-foaming the car and starting the contact wash. Today, the soap of choice was Obsessed Garage Decontamination Soap.


I love this soap! It has plenty of bite for jobs like this. As you will see later, it doesn't completely remove the remaining protection, but it certainly gives it a scare. The following steps help complete that stripping process. The first of which is the iron-decon step.


In the sprayer today is Gyeon Iron. I bought a 4 liter bottle of this several months ago for jobs like this where larger quantities of the product are used. Gyeon Iron was the cheapest of all the larger size iron removers including Carpro IronX, P&S Iron Buster and Meguiar's Clay Spray among others. Today I found out why this is cheaper, Gyeon don't lace this product with a scent to cover up at least some of the stench. This is a raw, unscented iron remover that would be the worst smelling iron remover I have used so far.

Once the iron remover was rinsed away, I clayed the car with Meguiar's Final Inspection as the lubricant. This is a BIG car, so I used a whole 500ml of Final Inspection. I also really love using this clay mitt, can certainly recommend and it's also very reasonably priced. Once the whole car was clayed, including the glass, I foamed the car with Carpro Reset and rinsed to remove any remaining chemical residue.


In a technical sense, the following step should have been done after the wheels but................I forgot. Did it need doing? Probably not, at least it will be clean for the service department. I am of course talking about the engine bay, which I rinsed with the pressure washer, sprayed with Green Star APC, agitated with brushes and then rinsed clean. I then followed up with a generous spray down with Meguiar's Hyper Dressing diluted to 3:1 for a satin finish. The hood is then closed and that's how I leave it!


After a blow down, which took longer than usual due to the diminished water beading, I then further dried the car with a wipe down using Carpro Eraser and TRC Gauntlet drying towel.

Now, I had considered not bothering to polish the car, in fact I never have with this car. This is my fathers car, and to be frank, he wouldn't notice the difference anyway. But............I went ahead with the polishing step, mainly because I had the time and wanted to see how Carpro Essence works.

So, it was out with the masking tape in preparation. Compared to my Ranger with it's plethora of unpainted black plastic, this Ranger is much simpler to mask up. On a Wildtrack, the mirror caps, door handles, grill and fender vents are painted in a grey accent colour compared to the raw black plastic on mine, so these don't really need to be masked up. The flipside is that they need polishing, give a little, take a little.


All that preparation work makes the polishing step easier and safer and it feels good to reach that moment.


For the most part, the car wash polished with Carpro Essense, a primer polish in the same mold as the Gyeon Primer I used last week. One could say they are the same product considering the two brands are made in the same factory, but they are definitely different products, more on that in a moment. You will also notice I have Sonax Perfect Finish on the cart, which was used on a couple of locations in need of additional cutting ability.


I have actually used Carpro Essense briefly before to repair some strange ghosting on a bonnet, so I kinda knew what it was like to work with.

Compared to Gyeon Primer, Essence is much nicer to work with and does not create dusting. It also offers more corrective ability depending on your pad choice and working time, while also offering some filling ability. Essence can actually be used as a stand-alone product, polishing and protecting in one step, as in an "all-in-one". However, it's main role is to lay a foundation for ceramic coatings, including ceramic-based spray sealants like Reload. Silver naturally hides most dirt and defects, but I'm very impressed with how Essence enhanced the look of the paint on this car without going to the trouble of multi-step correction or more heavy one-step compounds.

Important to note that there are two versions of Essence, the original described here and the non-abrasive Esscence Plus that is designed for maintaining a ceramic coating.

https://www.autogeek.net/carpro-essence-extreme-gloss-enhancer.html
https://www.autogeek.net/carpro-essence-plus.html

This car with its big, wide panels meant using the larger polisher was more efficient. Last week it was the opposite, the smaller 3-inch machine getting more use. The front bumper on the other hand is so complex that I did this in full with the Nano in D/A mode. The front bumper is always last for me, mainly because I hate doing them so much. Pad choice was the Shine Mate blue and the Rupes yellow on the Nano.


With the paint knocked out, it was onto a quick pass over the glass with P&S Clarity Creme. Like last week, I teamed this with a blue Lake Country HDO pad on the LHR75. This polisher is a beast on glass and feels so natural to use.


After giving the car a light wipe over with an Eraser-soaked towel to remove any polish splatter and tape residue, this is where I decided to leave it for today.


As mentioned, I was not going for perfection with the paint, I just wanted to enhance and prime the surface for coating. The combination of the mild corrective ability with it filling qualities, I'm really happy with how Essence performed here.

Tomorrow, Ceramic Coating the paint, applying a glass sealant before cleaning the interior and touching up several other little areas. And yes, I am having fun! :buffing:

What Ceramic coating?


Sent from my iPhone using Tapatalk
 
What Ceramic coating?


Sent from my iPhone using Tapatalk

Was going to be either Gyeon Pure EVO or CanCoat EVO.

I don't think I quite have enough Pure to do the whole car though, so probably CanCoat. In any case, I really liked applying CanCoat so I'm happy with that and Dad won't know the difference. :laughing:
 
Back
Top