Headlight Restoration-new UV sealant idea

Hello,

I just bought some Urethane online (solvent based) to begin coating headlights. I noticed it came in semi-gloss. Am I screwed? I thought I had ordered the high gloss/gloss product. Thanks.
 
Would the urethane UV protectant still "bite" on new headlights for extra protection? If not, what's best to use on new headlights to keep them protected?

I would use opti coat or c quartz on new headlights, although I have not tried it yet, it sounds like the best option for lights already in good condition. I have only used the spar urethane on lights that are already in bad condition needing a full restoration, but on lights that don't need sanding down, I just use a paint sealant like BFWD for the time being until I can get opti coat.
 
Hello,

I just bought some Urethane online (solvent based) to begin coating headlights. I noticed it came in semi-gloss. Am I screwed? I thought I had ordered the high gloss/gloss product. Thanks.

I have only used the gloss urethane, not sure how well the semi-gloss would work, probably the same just not as glossy. Maybe someone else will chime in.
 
Yeah, I am pretty bummed about this, thanks however. I will think about keeping it.
 
HotRod, I've got some questions if you don't mind.
1. When sanding the lights, do you wet sand each stage, and if not at what stage do you start wet sanding?
2. What's the roughest sandpaper you've used on a headlight?
3. After the lights are finished, what do you tell the customer to do as far as regular maintenance on them (wax them?)?

Thanks again for all your help on this!!

I just did a pair yesterday...i started out with 500 dry...it wasn't cuttin it because the old stuff that was on there was pretty thick..so i upped it to hand sanding dry with 320...worked much better...then did 500,800,1500 all dry and did wet 3000 and then compounded.

Ive seen a couple people on here say they stop at 3000...and got good results...and ive seen pics to prove it..but i dont know how...they just wern't clear enough for me to go on and apply the sealant...so i compound after 3000...and actually i think next time i'll skip 3000 and just go straight to compound after 1500 and just wetsand with 1500.

The end product was very very nice...there were a few scratches left if you looked REALLY hard, but that was only because these lights had these stupid little nubs on them that were difficult to sand around. Took me longer than i would have like because getting the initial coating off was really time consuming...after that was done though it was easy breezy.

I'll post pics in a little bit.
 
Thanks Will. I just finished a pair this weekend also, off of a Grand Am. The roughtest I had was 500 and it was a PITA to get the old stuff off. I'm going to get some 320 to have on hand.

It had the nubs also so I know what you mean.

I sanded 500, 800, 1000, (dry) then 1500 wet and they definitely needed compound after that. Used some Megs Plast X and came out great.

Ps.....I need a new 3" orange pad for my 3M backing plate do they sell those here?
 
I usually start out with 400, then go to 600, 800, 1000, 1500, 2000, and now 3000, skip the polishing step and apply the sealant. You don't always need 400, it just depends on how bad the lights are.

I think I am going to continue skipping the polishing step and just finish with whatever grit sandpaper works. You can test this with just applying mineral spirits with a rag on the sanded lights, it will show you how the lights will look with sealant applied. And it will determine if you need to keep sanding or not. I actually just did some turn signal lenses and finished with 1500 and then applied the sealant, and it looks really good but you still see slight scratches but nothing obvious. The reason for skipping the polishing step, is to help the urethane bite and bond to the surface better, hopefully making it last longer, although it still won't be permanent. I was private messaged about this several months ago from a member saying he skipped the polishing step, and finally decided to try it also. Pictures are in this thread, a page or two back from my experiment with some junk headlights.

I still think that using a random orbital for sanding instead of hand sanding may be the quicker and more uniform way of leveling the old clear off. But, for the time being I am just hand sanding, until i get the proper equipment.
 
Ok here are the pics of the lights i did yesterday.

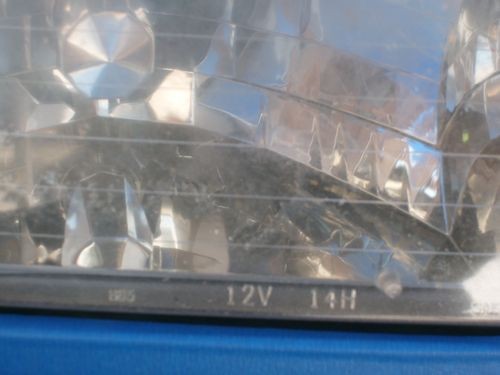
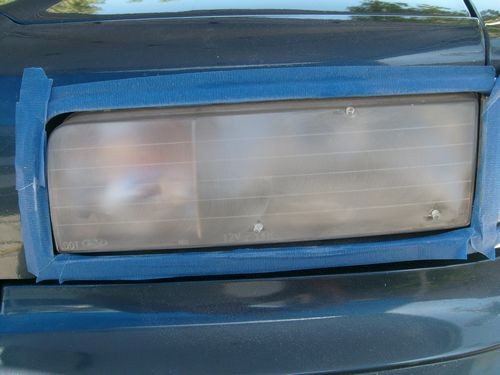
This is the passenger side before:

Passenger_Before_2_.JPG


Here is a close up:

Passenger_Before_Closeup.JPG


See the stupid little nub! There were 3 on each light...big pain in the ass to sand around.

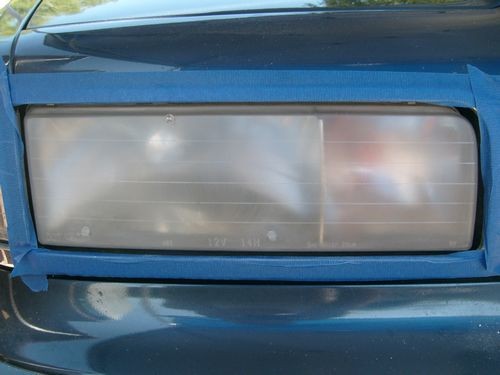
Heres how it looked after sanding with 320:

3201.JPG


I tried with just 500 first...but it kept leaving spots of the clear behind..kind looked like a leopard lol....so i got a sponge out and wrapped some 320 around it and did the whole thing by hand.

Then i hooked my 500 grit back up to my drill (3m headlight restoration set up). Quick note about that set up...the hook n loop backing plate REALLY grabs onto the sand paper...and when i went to take it off to switch...it started to pull the facing of the plate off lol...so THAT glue wasnt very good....so you have to sort of hold the face of the backing plate down while you remove the sand paper.

Anyway this is how it looked after 500 grit:

500.JPG


Mostly just smoothed it out...now too much clearer. Then with 800:

800.JPG


Starting to clear up the haze. Note that i did have to constantly wipe down the light with soap water spray and a MF cloth...also had to clean the dust from my sand paper a few times as well.

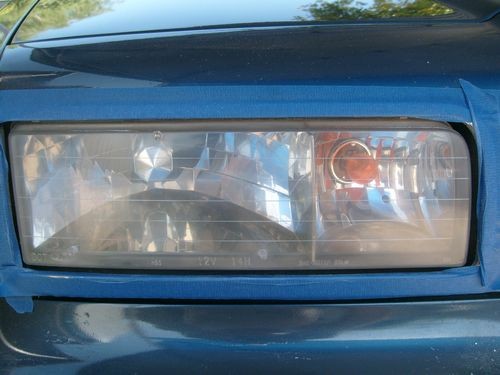
Then i did 1500 and 3000...3000 was wet...here it is after:

3000.JPG


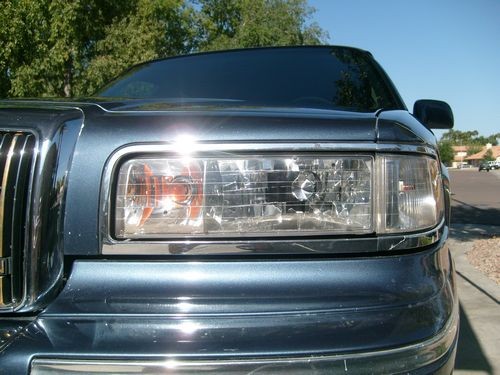
Then i compounded and added the sealant and this is the finished product:

Passenger_Finished.JPG


Heres a quickie of the drivers side after 500 grit:

D500_2_.JPG


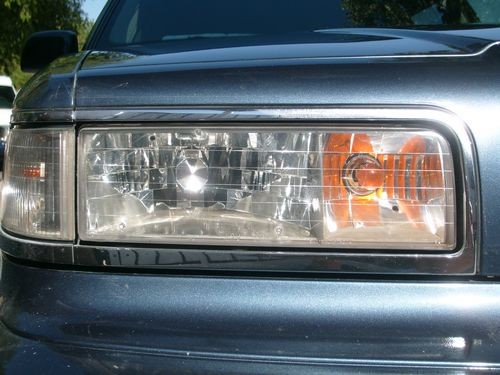
And I'll just skip to the finished photo:

Driver_Finished2.JPG


So there you have it.

If you sand by hand...get a sponge or a block...makes it much easier. And also if you get a lot of stuff coming off the lights like these did...keep cleaning your paper and your surface...otherwise you're just kinda spreading the dust around lol.

Hope you enjoy.
 
Thanks for the sponge/block idea.....that will help. One thing I did was use the 3" 3M backing plate with the sandpaper on it, just not chucked into a drill.

I've done both hand sanding and with a drill. I like going by hand especially if they have the nubs on the lights........you have more control over the sandpaper than you do with a drill.

The set I did this weekend still had a slight haze on them after the 1500, then looked fine after the buffing with the Plast X. The next set I do I will go on to 2000 and 3000 and see how they look. If I had done that with these I did, I may not have had to use the compound.


Are you sealing afterwards?
 
Can't seem to find a 3" orange pad to go on my 3M back plate.

Also does anyone know if the Megs 3" backplate have an adapter to chuck it in a drill?
 
Can't seem to find a 3" orange pad to go on my 3M back plate.

Also does anyone know if the Megs 3" backplate have an adapter to chuck it in a drill?

Hmm 3" pads shouldn't be too hard to come across. My 3M set up came with one. As far as the Megs 3" drill adapter i'm really not sure. The whole 3M set up is like $20 at walmart. Comes with 6 500 grits, 6 800 grits and a 3000 grit as well as a 3" orange pad and a small thing of compound. Either that or just get yourself a used PC...those dont have batteries that go dead :)
 
Hmm 3" pads shouldn't be too hard to come across. My 3M set up came with one. As far as the Megs 3" drill adapter i'm really not sure. The whole 3M set up is like $20 at walmart. Comes with 6 500 grits, 6 800 grits and a 3000 grit as well as a 3" orange pad and a small thing of compound. Either that or just get yourself a used PC...those dont have batteries that go dead :)

I got mine in a 3M kit also. That how I got into this whole headlight thing!!! LOL I've about worn it out. But I guess if sanding with 2K and 3K paper works as well as HotRod's have, it's a moot point :D
 
I got mine in a 3M kit also. That how I got into this whole headlight thing!!! LOL I've about worn it out. But I guess if sanding with 2K and 3K paper works as well as HotRod's have, it's a moot point :D

Same here to be honest.

I ran into the same issue you had. Was using the 3000 trizact discs, meguiars 105 for cutting compound, and then plastx as the final step and topping with opti-seal for UV protection.

The 105 got EVERYWHERE during the process. Slinging all over the place. Huge mess. Also, it was more steps, more expensive, and the UV sealant didn't last as long.

If you try this new method, just buy the 2-7'8" drill adapter backing plate from here, the meguiars unigrit foam adapter disc (just a 3" circle that is about a half inch tall that is foam and goes between your backing plate and the sanding discs, then get meguiars 320, 500, 800 unigrit sanding discs in 3" flavor and 3M 1000 and 1500 grit 3" sanding discs as well as 3000 grit trizact discs. For the 3M stuff, make sure you get hookit and NOT hookit 2.

If you follow up the 3000 with this new sealant it works great. No more meguiars 105 slinging all over the place off your drill and you can save steps and offer a longer warranty.

For hand sanding around other areas, get a "polishin pal" off autogeek too. Use it with that meguiars unigrit foam pad and then your sanding discs.

Also, make sure you use pure mineral spirits with a shop towel to wipe off any residue after the last sanding step. As said before this will give you an idea of how the headlights will look after applying the wipe on sealant. Be careful when you use the wipe on sealant too. If you go too thick, you will get streaks. I find it best to go from one side of the headlight and wipe to the other side. Use a CLEAN shop towel for each headlight, don't reuse the one you did the other headlight with or you will get more streaks.

Good luck.

-J
 
Last edited:
I don't like keeping urethane and mineral spirits cans in my car. Does anybody know if you can keep these chemicals in a plastic pump spray bottle or smaller plastic bottles?

Anybody tried applying the mixture with one of those foam painting brushes you can get at walmart? I think it might help spread it more uniformly.
 
Also, I use a 2 gallon garden pump sprayer from homedepot to keep water in for spraying down the headlights before and after sanding steps. This helps a lot too as opposed to trying to mess with a hose.
 
Since I have some real 2 part automotive clear coat, I tried to wipe some on a scrap headlight I have. It did not work well at all, it left big streaks. Obviously real clear coat is meant to be sprayed, not wiped or brushed on, however I wanted to try it out just to see what would happen.
 
Hello all! What a great resource this thread has been. Props to all for the excellent information you have all provided. Thank you HotRod for sharing your technique and starting this thread.

I have read basically every single post in this thread(3 days) and am absolutely shocked no one has tried the water based spar urethane mixed with water as a thinner. I'm in socal so no one sells the oil based stuff. :/

Well i had the opportunity to try it out earlier today, and its streaky. Real streaky. Could i be mixing it wrong? Maybe i need to thin it out more? ANY advice would be awesome.

I am using the blue auto paper towels...
 
Back
Top