How to Remove Hair line scratches on Wood Trim?

  • Make sure you wipe the surface clean.
  • Make sure your applicator pad is clean
  • Do some testing to an inconspicuous area before testing on an area your Dad can easily see

Working by hand actually requires skill and talent, working by machine means pretty much turning the machine on and guiding it over the paint while it does the work.


I can't count how many people have been through my Meguiar's classes that "tried" to remove scratches by hand and failed all due to their technique.


:)

Thanks Mike! :xyxthumbs:

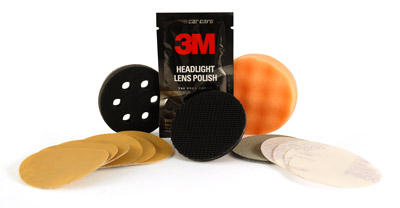
Do you think I'd be okay doing a test spot with ScratchX on a 3M polishing pad hooked to a drill going really slow? It's from the 3M headlight restoration kit. The combination works well on plastic headlights, so I figure it would work similarly with the coating on the wood.

Probably, just test first.

The pad in the 3M Headlight Restoration Kit is actually a foam cutting pad I believe and while it will work well to remove defects I probably won't finish out as nice as a true softer, polishing pad.

Step 5. on the below page refers to the pad as a compounding pad, which is normally a cutting pad.

3M Headlight Lens Restoration System, headlight polishing kit, restore yellow headlights, 3M plastic polish
3m-headlight-kit.jpg


Autogeek carries small foam polishing pads that could be used for a second pass to clean things up...


Lucky Dad!

:)
 
I never had any success removing them by hand. My interior had a lot of swirls.

I ended up taking the interior piece out, sat it on my lap, and as carefully as I could I took my griots to it with a white pad. It worked!
 
Recently, I polished out the wood trim in my ’00 540i. It was marred from the previous owner using god-knows-what as a towel to clean the dirty interior of the car (unwashed terry cloth, who knows?). I popped off the trim and proceeded to select a combination to remove the defects with. I decided to go the compound->Polish->Wax route. I decided on these steps b/c BMW clearcoated the wood trim in their cars at the time. I say “at the time” bc I’m not sure if this is still the case w/trim in the newer models. I’m unaware of which of the other car manufacturers CC their trim so I recommend proceeding w/caution if you don’t know if your trim is clearcoated or if you DO know that it’s NOT clearcoated. Anyway, I settled on:

Compound Step: Optimum Compound II on a 3” LC HT Cyan
Polish Step: Optimum Polish II on a 3 “ LC HT Tangerine
Wax Step: S100 Carnauba Wax applied with my fingers.

For the first several pieces of trim, I did the compounding & polishing steps BY HAND. Spent about an hour on each piece, using about 3-4 applications of the compound and 3-4 applications of the polish. The swirls were coming out but it was taking waaaay too much time & effort. Time to switch to the GG 6" DA.

After correcting the longest piece of trim and then the center console trim, I had to refine my method w/the DA. Same steps, but with the DA as opposed to by hand. The cyan pad was catching the edges of the trim and was falling apart rather quickly. I had only one 3” cyan pad & one 3” tangerine pad on hand, & the cyan was finished. Would 3-4 applications (speed 5) using the tangerine HT w/Polish II suffice, while leaving out the Compound II and cyan pad from the process? It did, and it finished out to near perfection. The compound step was unnecessary. This whole project was about removing swirls from CC, so the principle of using the least aggressive method applies here as it does with exterior paint.

Here’s a tip that really streamlined things for me: lock your GG DA, inverted, in a workbench vice and with two hands work the trim over the inverted machine. You don’t necessarily even need the vice. You can put the inverted DA on any surface w/o locking it down, but you have to make sure the machine doesn’t move or fall on its side. If it does fall on its side, you run the chance of contaminating the pad, scratching the trim, etc. After initially holding the machine in one hand and the trim in the other, my arms were being taxed too much. The inverted machine method allowed me great maneuverability working with the trim (turning, angling, pressure control, etc.) and was far less fatiguing on the arms.

Finally I applied (w/my fingers) some s100 that I have collecting dust b/c hey what the hell, right? Next time I clean the interior of the car, I will probably apply a sealant for better protection.

I wasn’t aware of this thread before my project, so I wasn’t taking pictures of what I was doing. Trust me though, this process works and was well worth the time.
 
Has opti-coat 2.0 been used to reduce the marring on these interior plastic trims?
 
Here’s a tip that really streamlined things for me: lock your GG DA, inverted, in a workbench vice and with two hands work the trim over the inverted machine.


Good tip.

I've done this before with rotary buffers and I believe it work pretty well with 3" and 4" pads on a Griot's or similar dual action polisher but if you try to use a larger pad AND at a high speed on a dual action polisher the pad will probably go flying off sooner or later.


I wasn’t aware of this thread before my project, so I wasn’t taking pictures of what I was doing. Trust me though, this process works and was well worth the time.

We always need pictures! Sooner or later it's going to help someone...


:Picture:
 
Mike,

I have the Wolfgang line, do you think I can use the Uber compound to remove the scratches?
 
Mike,

I have the Wolfgang line, do you think I can use the Uber compound to remove the scratches?


If they can be removed... Uber can do the job. I would lean towards starting with something less aggressive like the Total Swirl Remover but if Uber is all you have then use the Uber with a foam applicator pad.


:)
 
Greetings friends-
I understand this is an old thread concerning scratches on wood trim, but I was wondering do you have any advice to repair chips in wood trim, or direct me to a thread that may have already been done showing the method.

Please see attached pics and thanks for your time.

View attachment 56687
View attachment 56688
 
Back
Top