The Secret to Removing Oxidation and Restoring a Show Car Finish to Antique Single Stage Paints

I ran across this post through a Google search on what to do about the paint on a used white 1992 Acura Integra I purchased about a year ago. With over spray on some of the trim, and paint flaking off the edges of a few panels revealing perfectly good factory paint underneath, it appears that it has had a quick and dirty single stage paint job. I'm assuming that it was cheap fix for oxidation that typically occurs on these cars on the roof. Anyway, the condition of the paint matches the descriptions here of being dry, especially seeing how it seems to absorb stains rather easily.

This is my daily driver / beater car, but I’d like to it to still look neat and clean. When I bought it, it was terribly filthy, so after a wash I tried detailing clay for the first time with a Meguiar’s Smooth Surface Clay Kit. It did a decent job that lasted for quite a while, but this time around I’d like to see if I can do a little better with the process here of using detailing clay, multiple applications of Meguiar's #7 Show Car Glaze, and finishing with a carnauba wax.

With a car that size, what amounts of product should I purchase? I think one clay bar will do the job, but how much clay lubricant, #7, and wax do I need just to give this a try? I also noticed that #7 has been on back order for the week or so that I’ve been lurking on this site.
 
First, welcome to the forum!
You can buy #7 at many local auto parts stores if AutoGeek is temporarily out of stock. One 16 oz. bottle should be all you need. I believe Mike used more in the article, but that Lincoln was a BIG car. Same with the clay lube and wax- one will be more than enough. Most folks here, myself included, mix their own clay lube from a waterless wash, such as:Optimum No Rinse Wash & Shine: clay lubricant, optimum rinseless wash, no rinse car wash, optimum detailing products. It's a lot less expensive that way. Also, most clay bars are twice the size that you need. Break off a piece and flatten it to about a 3"-4" patty. Use one side and when it gets dirty, fold the dirty side in, flatten again and go to work with a fresh surface. Here's one of Mike's tutorials on using clay:http://www.autogeekonline.net/forum/how-articles/20259-tips-techniques-using-detailing-clay.html

Bill
 
Mike makes it look easy.... Because he is the best at what he does.

I can tell you that it's NOT easy at all....

It takes a lot of time... Days and days and could be over a week depending..... On ONE CAR...

And a lot of the hardest work will be by hand..... And there is no way around it.....

It's all about blood sweat and tears and the passion of bringing the paint back. :dblthumb2:

Thanks for the compliment and I agree with you... rubbing out antique cars with original paint is all about the blood, sweat, tears and a whole lot of passion.


Yes, I have done it before, more than once and it's something that you really have to be committed to 100% to before even taking on a job like that.

I agree with that too... and I'll add that you need to have the right mental approach to these types of projects...

The Mindset of a Professional Detailer


And make sure the customer is really willing to pay for it because it's not going to be cheap.

That can be a tuff nut to crack. Too often the people that own these types of cars don't get it. Sometimes they don't care about restoring the paint to show room new like "we" the detailers have the passion to do and sometimes the just don't see the value in polishing out the paint on their old car.


My hats off to Mike for showing the dedication and passion that is needed to achieve results like he did.

I'm just passing on what I've learned from others over the years like from my mentors Jack Birkby and Bill Stuart. Two guys that were doing this before we were all born and while they are still with us you won't ever see them posting to a forum.

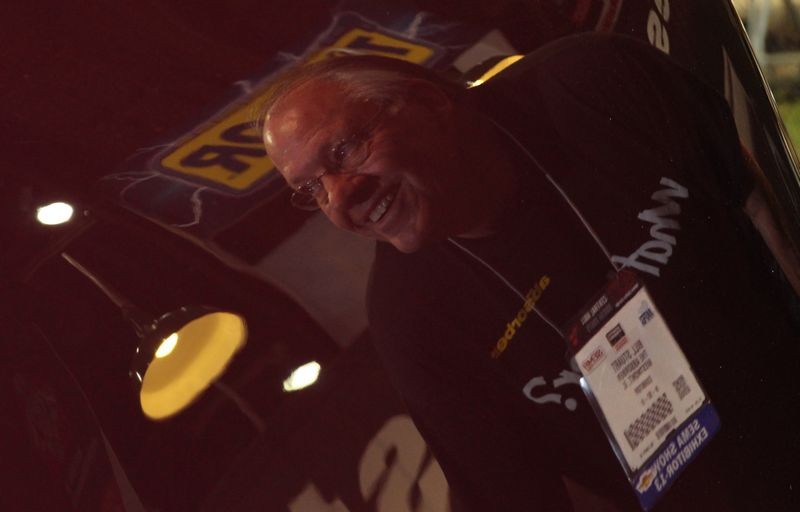
I don't have a picture of Jack Birkby hand but here's one of Bill Stuart...


Black Label PC on Fearless - John Mayer's 1935 Ford Cabriolet at SEMA in the Absorber Booth


And I took a few pictures of Bill looking into the piant...

John_Mayers_1935_Ford_037.jpg


John_Mayers_1935_Ford_039.jpg


Due credit where credit is due...


:dblthumb2:
 
This 1st application is the hardest and then each subsequent step will go smoother and easier.

I don't know the condition of your paint, but if it's heavily oxidized like his one definitely do multiple applications.

And remember, you don't have to scrub really, really hard in a vigorous motion.

It's more like rubbing a sore muscle - you want to use firm pressure, but not hurt yourself in the process.


The bold part above... excellent advice. Just be sure to use a terry cloth wash cloth like I show in my pictures as it is the nap or tiny cotton loops of fiber that act as your abrasive to chew off the dead oxidized paint while forcing the oils in the #7 into the paint.


:dblthumb2:
 
my progress so far 3 applications. I was sweating at 38 degrees :)

the paint shines now. but I haven't been able to bring the car outside to confirm the quality due to shitty NE weather. I will probably do one more pass.


aYiP7zc.jpg
 
I did, it's probably hard to tell the difference. the paint on my car wasn't as bad as the one other has posted. but up close, you can easily tell the paint was oxidated over the years. it was also dull.

please note both before and after are without any kind of wax

xa6ins3.jpg

RK8b4u5.jpg

griPpRZ.jpg

7LoUgZs.jpg

28FusXh.jpg
 
Good job!

I can tell a difference. Sometimes a picture cannot fully share what you can see in person. It's still important to capture the before shots....


:dblthumb2: :dblthumb2: :dblthumb2:


For all the forum members and lurkers that will read this into the future.... read this BEFORE making a shiny spot on original paint.

The power in the after shots is created in the before shots


:)
 
Can we do this treatment every year? let's say in the winter. and with less applications than the very first time.

would be too much? ultimate goal is to keep the car shine.
 
I've done it yearly on my El Camino since 2010, usually in late spring before cruise/show season. When you rub as much #7 in as I have over the years, you get a feel for whether the paint's soaking it up or it's just laying on top. I'll always do at least one overnight soak, followed by one more application. I'll then evaluate the finish for my product choice for the next step, using either M80 or M03, applied by machine. After that, I'll use some Collinite 915 to seal it all up then a beauty wax ( Dodo Juice, Meg's M26 or Pinnacle) during the season. Some may argue that the tedious M07 hand rubs may not be necessary every year for a garage queen, but IMO, my now 26 year old paint looks incrementally better every year.

Bill
 
Can we do this treatment every year? let's say in the winter. and with less applications than the very first time.

would be too much? ultimate goal is to keep the car shine.


#7 is non-abrasive. As long as you use a soft foam applicator pad you should be okay on soft single stage paint.

Before 1951 Meguiar's didn't make a wax and that was because Frank Meguiar Jr. didn't believe in wax. He believed in polishing often with a product like #7.

Point being if you polish often, and the key is "often" you don't need wax and he's right. The problem with this was two fold,

1. People are busy and don't have time to polish often. A water insoluble wax extends the time between needed re-application of a water soluble polish.

2. Since Meguiar's didn't have a car wax until 1951, (M16), after using Meguiar's cleaners and polishes to restore and maintain a car's paint if a person WANTED to use a wax they would have to use something like Blue Coral or Simonize and this probably didn't sit well with the people at Meguiars'. So they introduced their first wax.


Interesting stuff huh?


But to your question, "yes" you can polish often, just be careful around corners and any raised body line or panel edge as paint will tend to be thin in these areas.


:)
 
Mike,

my car came out amazing, I used a whole bottle and was finally able to take some pictures after waxing. these were all done before machine polishing. You saved me hundreds if not thousand of dollars. And I can proudly say I made my car shine again!

currently, still need to be done. To machine polish the front and rear bumpers. as they have heavier spider webs than the rest of the body. the body panels actually have very minimal swirls. it's amazing consider the paint is 20yr old. and I think the bottom half of the front bumper still look matte vs other panels.

THANKS A LOT MIKE!

some pics. (will take better photos when the snow is gone)

GL0PKzA.jpg

tnw2aE4.jpg

RU4FDVg.jpg

dtaaWwf.jpg

MxVESAi.jpg
 
Simply AMAZING!


Nice work! I would recommend creating a dedicated thread for this project you did, that is post a little write-up showing the before and after pictures and share the process.

It's good to have it here in this thread as this thread gets hit a LOT since it's really the only article like it in the world.

Thing is though, your before pictures are on page 13

http://www.autogeekonline.net/forum...ar-finish-antique-single-stage-paints-13.html


and your after pictures are on page 14


http://www.autogeekonline.net/forum...ar-finish-antique-single-stage-paints-14.html


And the results look so good that it would be nice to have a dedicated write-up to inspire others into the future. Up to you...


Again... excellent, excellent work....


:dblthumb2:
 
Mike, I would greatly appreciate some advice please.

I have a customer who is planning on bringing me his '84 Golf MK1 for a makeover.

He claims it is still the original paint and I did a small test on an inconspicuous spot with a little finishing polish by hand, and there is definitely color transfer which supports the 'no clear coat' viewpoint.

What I am trying to understand is how do I tell if this is genuinely the original paint or if the car has been re-sprayed with no actual clear (perhaps 2K paint?)

a) is there a difference between the single stage paint this thread makes reference to and '2K' paint.

b) if there is, will number 7 still be the go-to product initially to 'nourish' the paint before attempting any sort of correction work

Here is the car in question
IMG_0822_zps74bfbcc2.jpg


IMG_0832_zps0b591e1b.jpg


Thanks in advance
 
Mike, I would greatly appreciate some advice please.


Wow... what a bummer....

I typed out a detailed answer with some paint history and then clicked on the [Submit Reply] button and the forum crashed on me and I lost everything I typed.

So because I have to move onto a hot project the answer is,

Yes, apply and work the #7 into any single stage paint that's neglected it it will benefit the paint and the process.


:)
 
Lots of great input. Just plan on a lot of time to restore single stage paint thats oxidized!
 
Mike,
Thank you (and everyone who contributed) for this great thread which is gold for anyone who's got the vintage vehicles bug!
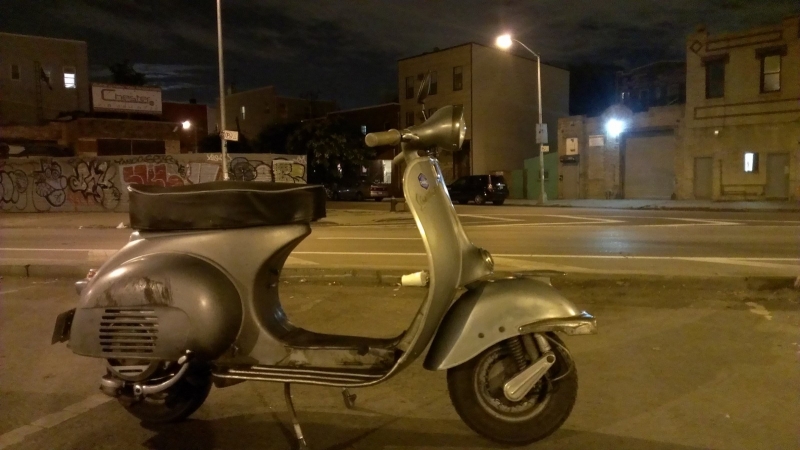
I was wondering if you could help with a couple of questions I have about restoring the original single stage paint on my 1959 Vespa scooter. Most of the original paint is in more than fair conditions (which is one of the reasons why repainting is not an option), but there are also patches of rust here and there, and surface rust spots which I've noticed come off pretty easily.
I want to follow the process you outlined at the beginning of this thread but I'm not sure about the best way to address the rusty spots. Should I definitely avoid using the Meguiar's #7 (and the clay) on rust, or is it fine to just apply all products on both painted and rusty areas?
The 2 pictures below should hopefully clarify the situation.
The second question is about the saturation application which you explained in this thread - I've tried to follow your instructions, but I don't understand how I'm supposed to spread the product on the paint so that it can soak in overnight. I did pour the #7 on the towel as you demonstrated, and my test surface is very small (license plate holder, about 8" by 8") but the vast majority of the product was retained by the towel, and the paint appeared to be dry pretty much instantly (although looking already better than before) , so unless I pour half a bottle for every 5" square, I'm not sure how the #7 could actually soak in overnight.
Should I use a paint brush or something like that to spread the product for the saturation application?
Thank you very much once again and apologies for the newbie questions.
Gabri
 
Reposting pictures properly this time, and a new one with the actual scooter.
Thank you.
IMAG0712.jpg


IMAG0978.jpg


IMAG0979_2_.jpg


Mike,
Thank you (and everyone who contributed) for this great thread which is gold for anyone who's got the vintage vehicles bug!
I was wondering if you could help with a couple of questions I have about restoring the original single stage paint on my 1959 Vespa scooter. Most of the original paint is in more than fair conditions (which is one of the reasons why repainting is not an option), but there are also patches of rust here and there, and surface rust spots which I've noticed come off pretty easily.
I want to follow the process you outlined at the beginning of this thread but I'm not sure about the best way to address the rusty spots. Should I definitely avoid using the Meguiar's #7 (and the clay) on rust, or is it fine to just apply all products on both painted and rusty areas?
The 2 pictures below should hopefully clarify the situation.
The second question is about the saturation application which you explained in this thread - I've tried to follow your instructions, but I don't understand how I'm supposed to spread the product on the paint so that it can soak in overnight. I did pour the #7 on the towel as you demonstrated, and my test surface is very small (license plate holder, about 8" by 8") but the vast majority of the product was retained by the towel, and the paint appeared to be dry pretty much instantly (although looking already better than before) , so unless I pour half a bottle for every 5" square, I'm not sure how the #7 could actually soak in overnight.
Should I use a paint brush or something like that to spread the product for the saturation application?
Thank you very much once again and apologies for the newbie questions.
Gabri[/QUOTE]
 
Mike i`ve startet to read your book, verry helpfull, finished this thread and i still dont understand one thing, single stage paints before 1980 i`m not very intereset in this because in Macedonia we don`t have such old cars, but here cars after 1995 all look like single stage paint, people here dont take care of their cars, never polished, never waxed, non-stop in a direct contact with sun, non garaged. And i don`t know if they may be single stage or are wery oxidasied. some photos with what i need to deal, 70% of cars somwhere 12/15 year old look like this:

images


images
 
Back
Top