The Cure for M105's short working time and dusting issues

3. Your applied pressure is very inconsistent.
This is one of the reason I say to add pressure. It compresses the pad and forces it to contour to the panel. This results in even abrading, less flinging, less clumping. Your pad is speeding up, slowing down, pressure is varied across the pad depending upon how you are holding the machine and how the pad is contacting the panel.

Would this be the case with a Flex 3401 as well?

A bit hard to do considering the tight tolerance of the backing plate in relation to the aluminum housing. As you already know, this can be a problem when the plastic backing plate hits the aluminum. I suspect that you have already added two supplemental washers to increase backing plate clearance and to minimize backing plate Flex (no secret you are a HUGE Flex fanatic). I think that the biggest problem you'll encounter when adding pressure to the Flex is the way the machine will drive the pad in all sorts of directions.

If I was using the Flex, I'd be sure to use a pad that contours well, yet is aggressive enough to keep the product from sticking to the paint surface.

Two supplemental washers? :confused:

Can you give me examples of a pad that contours well? :props:
 
Adding mineral spirits or mineral oil may extend the working time, but can have other adverse effects on results. One might experience premature pad loading, temporary paint defect filling, paint swelling, and reduced cut rate. Or, a combination of all of these.

I understand the concept of paint swelling but I still have not heard of much problems with defects returning just because of the use of mineral oil.

In the past many assumed M80 was a heavy filler product that does not correct but hides the swirls. M80 uses the same oils as M07 and from your own words "Pure polishes intended to "feed" dry paint are specifically formulated for this purpose." With m07 being a pure polish and is formulated to feed/swell paint is it safe to assume M03/05/07/80 can and will also swell paint to a degree.

If so then a product like M80 who's high feeder oil content would theoretically "swell paint" there should be a high number or defects reappearing once the oils have had enough time to evaporated/out gassed. This is not the case though as even if the oils do swell the paint, to some degree, total defect removal is achieved and not simply masked. Since M80 has been proven time and time again to achieve true correct it seems the role of solvents swelling paint to has little real world effect.

I know the majority of compounds and polishes on the market today use mineral oil or glycerin as a lubricating oil and the amount used differ from each manufacturer, but even so, brands like Optimum and Menzerna that use higher amounts of the two oils in their polishes than other companies have none of these problems.

In the end there is really not enough data about the effects of solvents/oils/alcohol swelling paint and hindering the process of defect removal.

I will give M105 another go using the tips you and Kevin have given and see if there is any improvement. Even thought I have done it countless times and have thoroughly read Kevin's post on his methods over on DetailingWorld, I will give another shot. :buffing:
 
2. Try mixing M105 with M205 - three parts M105, one part M205 or a ratio of your own. This will decrease the total cut, but will increase your working time.

What's your method for mixing these to get the final compound evenly mixed and consistent for the bottle? Do you do multi-layers of a 3:1 of M105 and M205 a few times in a 8 oz. squeeze bottle then shake or possibly stir with something?

On another note how does the working time of the consumer line of SMAT products compare say for UC and ScratchX 2.0 since these have reduced cut from M105? Thought it might save me some mixing if this worked out to be a longer working time.
 
In the past many assumed M80 was a heavy filler product that does not correct but hides the swirls. M80 uses the same oils as M07 and from your own words "Pure polishes intended to "feed" dry paint are specifically formulated for this purpose." With M07 being a pure polish and is formulated to feed/swell paint is it safe to assume M03/05/07/80 can and will also swell paint to a degree.

As far as I know, these oils are not antagonistic to the paint and haven't been for over 100 years. Plus modern clear coats in good condition are not dry. Dry like in dried out, not dry as in dry to the touch.


Since M80 has been proven time and time again to achieve true correct it seems the role of solvents swelling paint to has little real world effect.


That's assuming the polishing oils are antagonistic towards clear coat paints?

The polishing oils used in products like M07 or M80 have been around and being used on automotive paints since as early as probably the 1900's, maybe later like into the 1910's... it's hard to know because there's not too many people around that would remember and the folks we still do have around that might know don't talk about it or post to forums. Chances are good, I've posted the most pictures of the vintage products and the most information about them and this isn't even much...


Mike Phillips said:
Bringing the dead back to life...
Besides being used as described above, #7 is also famous for its ability to revive dead, oxidized single stage paints. This has to do with the unique feeder-oil formula created by Frank Meguiar’s Jr. back in the early days of Meguiar’s which was also the early days of the Automobile. Meguiar’s was founded in 1901 and for perspective, only a few years earlier in 1886, Karl Benz was awarded a patent for a gas-fueled car and it wasn’t until 1908 that Henry Ford introduced the Model T.

I don’t know exactly when #7 was introduced but I think sometime in the early 1920’s, like 1923 or 1924. While #7 may have been introduced in the 1920’s, the formula that became #7 was around even earlier, possibly back to 1901. Here's a collection of 4 very old Mirror Bright polishes; it is my opinion that the formulas used in these products were pre-cursors to what became #7 Sealer and Reseal Glaze.

Photos Courtesy of MeguiarsOnline.com
24OldMegsBottles.JPG


I don't want anyone thinking Jason can hang out and participate is the kind of discussions like we have here where every little minutia is debated and dissected to death, as I posted previously, he's a very busy guy and posting to forums is an extra on his plate... just want to point this out so no one has unreal expectations.

That said, I'm not going to speak for Jason as he as direct access to real chemists as a part of his job so he has access to more information than most us ever will ever have including myself.

What I was told from a good friend and a chemist is that when "new" modern clear coat paints are very solid or not permeable, that is liquids will not easily penetrate into them. He told me over time, as in over spans of years, the layer of paint due to wear-n-tear, scratching and degradation, expanding and contracting, will become more open to some level, or more permeable.

This is why applying a coat of #7 to a brand new car with brand new paint does not create a WOW! before and after... the paint is already in excellent shape to start with... it should be... it's a brand new car.

Plus remember the paint doesn't absorb very well when it's brand new.

Part of the WOW factor you get when using the polishing oils unique to the Meguiar's pure polishes, and even cleaner/polishes is when they restore a dry, whitish or opaquish color back to it's original vibrant color and that's because these oils do penetrate or "feed" into the paint and do their magic.

Huge difference between traditional solvent-evaporation single stage paints and modern, catalyzed basecoat/clearcoat paints.

See this article,

The practical differences between single stage paints and a clear coat paints


And this article goes into the ability of the oils in products like M07 and M80 to "feed" the paint.

The Secret to Removing Oxidation and Restoring a Show Car Finish to Antique Single Stage Paints


Excerpt from the above article...

Mike Phillips said:
This is key...
Saturation Application --> The First Application

This is a mostly unknown technique and that is to let the first application penetrate and soak into the paint for up to 24 hours before wiping the product off. The idea being to really apply the product wet and work it in really well and the walk away.

The idea is to allow the heavy concentration of oils to penetrate and seep into the paint for maximum saturation before removing the product and continuing with the process. In this case I finished applying the first application of #7 around 9:00 pm and then left the #7 to soak in until the next day. I started wiping the product off then next morning right about 10:00am.

Some will argue if this works or not buy my experience is that with a porous single stage paint it does in fact help. One thing for sure it can't hurt.

Paper Test for Capillary Action
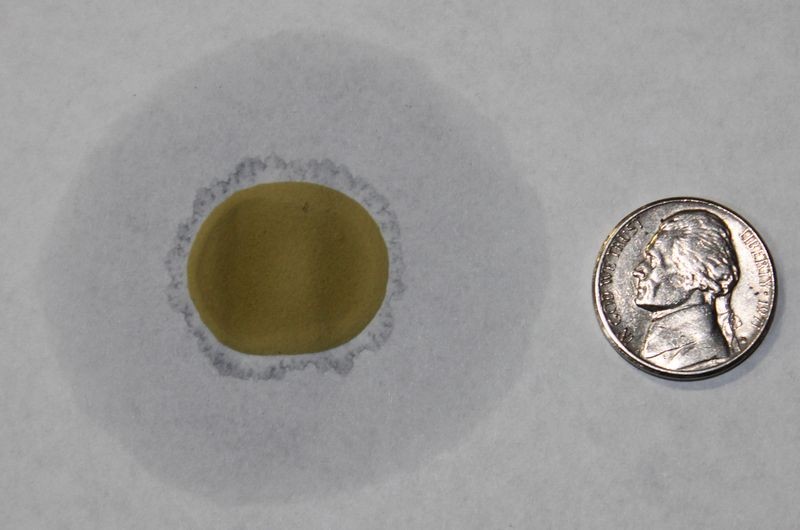
If you place a few drops of #7 onto a piece of paper and then monitor it over a few days you will see the oils in the #7 migrate or seep away from the actual drop of product. It does this through capillary action and the same thing can work to your car's paints' advantage if it's a single stage lacquer or enamel paint.

I placed a few drops about the size of a nickel on a piece of standard printer paper around 3:00pm.

7CapillaryAction01.jpg


The next day I took these pictures at approximately 10:00am, (19 hours later), note how the oils in the drops of #7 have migrated outward via capillary action.

7CapillaryAction02.jpg


Feeder Oils penetrate or feed the paint
This same effect can take place in a single stage paint but not only will the oils travel horizontally, they will also travel vertically, that they will penetrate downward "into" your car's paint and this is where the term feeder oils comes from as the oils penetrate into or feed the paint. The result is they will condition the paint restoring some level of workability as compared to just working on old dry paint, and they will also bring out the full richness of color, something that will showcase the beauty of your car's paint.


I know the majority of compounds and polishes on the market today use mineral oil or glycerin as a lubricating oil and the amount used differ from each manufacturer, but even so, brands like Optimum and Menzerna that use higher amounts of the two oils in their polishes than other companies have none of these problems.

In the end there is really not enough data about the effects of solvents/oils/alcohol swelling paint and hindering the process of defect removal.

One thing I learned while at Meguiar's is MSD sheets are not formulas and there are many different "forms" of a specific substance, so while reading a the label of a product, or the MSD sheet and discovering a listed ingredient that conjures up a "picture" in your mind, like a bottle of Baby Oil, doesn't mean the same category of product is in the same form.

That's about as deep as I ever want to get into the chemistry of car care products, most of us are not chemists and the only time it really counts in a conversation like this is when the "actual" chemist that created the formula joins in and presents factual, accurate information and that doesn't happen in this industry. So "most" of any discussion like this is just conjecture...

Nothing wrong with conjecture and assumptions, but that don't make it factual or accurate. But keep in mind, I'm just as interested in the chemistry of car care products as most of you and just by my longevity in this industry a case could be made that I'm more interested... but I also know that chemists in this industry don't share "what's in the bottle".


I will give M105 another go using the tips you and Kevin have given and see if there is any improvement. Even thought I have done it countless times and have thoroughly read Kevin's post on his methods over on DetailingWorld, I will give another shot.

Good take away from the discussion... keep us posted...


:xyxthumbs:
 
Very Informative.
Thank You Jason for posting and clarifying "Paint Swelling".:props:

Paint may feel hard to the touch, but it is really an elastic semi-permeable membrane. It has to be, because the substrate the paint is bonded to expands and contracts. So, automotive paint is designed to be elastic so it can move with materials that are moving underneath it. This is even more relevent with after market refinish paint.

Certain fluids can permeate paint coatings and "soak" in. Pure polishes intended to "feed" dry paint are specifcally formulated for this purpose.

Heat by itself (such as black paint in direct sunlight on a very hot day) or heat and friction (such as rotary buffing) can swell paint...making it temporarily "taller." Oils and solvents innate to paint, can expand with heat. Oils and solvents in the compound or polish can expand the paint with heat. This is a more prevelent occurance with fresh paint on a refinished panel, but can also occur with OEM applied paint.

If you were actually able to seperate the paint coating from the primer and substrate...it would feel like a plastic sheet that stretches. Soak this "plastic sheet" in mineral oil and it will weigh more afterward.

(BTW...this is the secret to paintless dent repair, being able to bend back the dent in the substrate while having the paint hang with it and go for the ride without cracking...but don't tell the guys that do that for a living. They may not want the "secret" to get out.)

Paint swelling can be measured with the use of a paint thickness guage.

Measure the paint thickness on a black car in the morning before pulling it out of the garage. Then measure the same spot at 3pm after a full day in the direct hot sun.

Or measure the paint thickness before rotary buffing, then measure the same spot immediately after rotary buffing. In most cases it will be taller. And when the paint cools down, it will shrink down.

Paint is more like human skin, than a hard coating.

I'm talking about paint elasticity and swelling as if it were the same thing. It really isn't, but the same chemistry and dynamics are at play with either one.

Hope that helps.
Jason
 
For anyone reading this thread, experiencing any issues with M105 or the Ultimate Compound, read everything Jason Rose writes and everything Kevin Brown writes because both of these guys are incredibly knowledgeable about detailing cars in general and polishing paint in specific.

Here's some more tips on doing correction work with a DA Polisher that I posted to a similar thread here...


Meg UC dusts too fast ...

10 years car - never been polished
temp was about 90F - I'm in S. San Jose

tnx

If the paint is in severely neglected condition, it's going to decrease the working time of any product as compared to paint that's smooth and shiny to start with.

The worse the condition the paint, the smaller the area you work for your first step product.

2" square sections are too large for most people using a DA Polisher, I think I type chopping your work area down to about 18" to 20" squarish or so... the big picture is don't try to tackle too large of an area at one time, which is the norm for most people new to machine polishing and why I listed it as one of the top 3 most common problems in an article I wrote in 2007 here,


Mike Phillips said:
Tips & Techniques for using the G110v2, G110, G100, G220 and the PC Dual Action Polisher
(These are all similar tools)

After teaching hundreds of classes here at Meguiar's, there are some common mistakes most people make when trying to remove swirls and scratches with a dual action polisher. Most of them have to do with technique.

Here's a list of the most common problems

  1. Trying to work too large of an area at one time.
  2. Move the polisher too fast over the surface.
  3. Too low of speed setting for removing swirls.
  4. Too little pressure on the head of the unit.
  5. Too much pressure on the head of the unit so the pad quits rotating.
  6. Not keeping the pad flat while working your product.
  7. Too much product, too little product.
  8. Not cleaning the pad often enough.
Here's a list of the solutions in matching order,

  • Shrink your work area down, the harder the paint the smaller the area you can work. The average area should be and average of about 16" by 16" up to 20" by 20" or so. You have to do some experimenting, (called a Test Spot), to find out how easy or how hard the defects are coming out of your car's paint system and then adjust your work area to the results of your Test Spot.
  • Use a slow arm speed.[/b] For removing defects out of the paint you want to use what we call a Slow Arm Speed. It's really easy to move the polisher too quickly because the sound of the motor spinning fast has a psychological effect to for some reason want to make people move the polisher fast. Also the way most people think is that, "If I move the polisher quickly, I'll get done faster", but it doesn't work that way.
  • When first starting out many people are scared of burning or swirling their paint, so they take the safe route of running the polisher at too low of a speed setting, again... this won't work. The action of the polisher is already g-e-n-t-l-e, you need the speed and specifically the pad rotating over the paint as well as the combination of time, (slow arm speed), together with the diminishing abrasives, the foam type, and the pressure to remove small particles of paint which is how your remove below surface defects like swirls or scratches. It's a leveling process that's somewhat difficult because the tool is safe/gentle while in most cases, modern clear coat paints are harder than traditional single stage paints and this makes them hard to work on. This is also why people get frustrated, they don't understand paint technology, all they know is their paint swirls easy and getting the swirls out is difficult and thus frustrating.
  • For the same reason as stated in #3, people are scared, or perhaps a better word is apprehensive, to apply too much pressure and the result of too little pressure is no paint is removed thus no swirls are removed.
  • Just the opposite of item #4, people think that by pushing harder on the polisher they can work faster and be more aggressive, but the truth is the clutch in the tool is a safety mechanism to prevent burning and will cause the pad to stop rotating, thus less cleaning or abrading action and once in a while this will lead a person to then post on the forum something like this, "Hey my pad doesn't rotate". There needs to be a balance of enough pressure to remove defects and keep the pad rotating but yet not too much pressure as to stop the rotating action. This balance is affected by a lot of things, things like type of chemical, some chemicals provide more lubrication and the pad will spin easier, curved surfaces or any raise in body lines will tend to stop the pad from rotating. This is where experience on how to address these areas comes into play or you do the best you can and move on. It's not a perfect tool, nor a perfect system, but it's almost always better than working/cleaning by hand.
  • Applying pressure in such a way as to put too much pressure to one side of the pad will cause it to stop rotating and thus decrease cleaning ability.
  • Too much product over lubricates the surface and this won't allow the diminishing abrasives to do their job plus it will increase the potential for messy splatter as well as cause pad saturation. Too little product will keep the pad from rotating due to no lubrication and there won't be enough diminishing abrasives to do any work. Again it's a balance that comes with experience, or another way of saying this would be it's a balance that comes with hours of buffing out a car to learn what to do and what not to do. Information like what you're reading here is just an edge to decrease your learning curve. Hope this is helping.
  • Most people don't clean their pad often enough and most of the time the reason for this is because they don't know they're supposed to clean their pad often and they don't know how to clean their pad. Again, that's why this forum is here to help you with both of these things. You should clean your pad after every application of product or every other application of product, your choice, most of the time cleaning your pad after every other application of product works pretty well. It enables you to work clean and enables the foam pad, the polisher and the next application of fresh product too all work effectively. How to clean your pad will be addressed below sooner versus later, but not at the time of this posting. (Sorry, I'm behind a keyboard, not a video camera
The first 4 are the most common.


I started from 3 and then moved to 6.
I just didn't what to expect ...
based on videos I saw I see compound leftover on pain, while in my case it started kind of drying and then dusting - so I stopped to check.

No video I've ever been involved with recommends or teaches to use anything slower than th 5 setting when using a compound or polish to do "correction" work. It's not going to work and the pad probably isn't rotating well on the 3 setting thus it's not working or agitating the product enough to keep it liquid on the surface.

This article explains what's going on...

Mike Phillips said:
Tips for working in warm/hot weather or direct sunlight

excerpt...

Shrink your work area down to a smaller size...
Anytime a product becomes difficult to work with, one tip you can try is to shrink down the size of your work area. This means you spread the product out over a smaller area and because you're engaging the working film of product over the area more quickly as you move the polisher there's less time for the product to dry.


Clean your pads often or switch to a clean dry pad...
It's vitally important to work clean and this means cleaning your pad often and often can mean cleaning your pad after each Section Pass no matter which type of polisher you're using.

The entire article is filled with good information that will help you, I would recommend clicking the above link and give it a good read-through...


Then I wiped out and applied more UC to pad and did another horizontal and vertical pass and it was dry ...
When I wiped out it was like haze after wax
I was expecting UC to be oily vs dry
Not sure I explain it right.

No car was not been driven before, engine was cool and it was inside garage - no direct sun.

Work small sections at a time. Buffing a car out using a DA Polisher is a matter of working small sections at at time and then when moving onto a new section, overlapping a little into the previous section.

You slice up your car mentally into sections, this picture is an example of slicing up a car hood...

slicinguppanel.jpg


Then watch this...
How to do a Section Pass
[video=youtube_share;Q70g83mnTn4] - How to do a "Section Pass" with a Porter Cable 7424XP[/video]

:buffing:
 
A bit hard to do considering the tight tolerance of the backing plate in relation to the aluminum housing. As you already know, this can be a problem when the plastic backing plate hits the aluminum. I suspect that you have already added two supplemental washers to increase backing plate clearance and to minimize backing plate Flex (no secret you are a HUGE Flex fanatic). I think that the biggest problem you'll encounter when adding pressure to the Flex is the way the machine will drive the pad in all sorts of directions.

If I was using the Flex, I'd be sure to use a pad that contours well, yet is aggressive enough to keep the product from sticking to the paint surface.

Not to take this thread further off topic as I'm really enjoying it and appreciate all the info but I have to respond to this particular post.

Kevin, I personally haven't modified my Flex 3401 in any way and haven't noticed any issue like that which you alluded to. Other then placing a few drops of air tool oil on the felt ring a few times, I've done nothing. I have placed some serious downward force on this machine many times while polishing and haven't seen what you're talking about with regards to backing plate/housing interference. Never heard of anybody else having that issue either.
 
...Kevin, I personally haven't modified my Flex 3401 in any way and haven't noticed any issue like that which you alluded to. Other then placing a few drops of air tool oil on the felt ring a few times, I've done nothing. I have placed some serious downward force on this machine many times while polishing and haven't seen what you're talking about with regards to backing plate/housing interference. Never heard of anybody else having that issue either...

Great to hear. :righton:

My opinion was partly based upon a discussion that took place in this thread: G110 or Flex - Car Care Forums: Meguiar's Online
 
I too found M105 a pain in the butt to use the first time I used in and that has been only once. After doing about half the car with the DA buffer, didn't take me long to realize I was using too much product. I started just putting 3 pea size dabs on the orange pad. It started working much better with hardly any dust. I also didn't have to clean the pad as much.

mineral oil, water or mixing M205 should not have to be an option to make is easier to use. Maybe there will be a solution not too far down the road with revised product. This is a good post and is getting attention, that is good.
 
...I will give M105 another go using the tips you and Kevin have given and see if there is any improvement. Even thought I have done it countless times and have thoroughly read Kevin's post on his methods over on DetailingWorld, I will give another shot...

I applaud your tenacity, your sticktoitiveness, your patience, your ingenuity. Not a lot of guys will try-try-try to understand how something works, or dare post a video for all to see. If you could see me now, you'd notice that the hat I was wearing? Well, I took it off... for you!


Okay, I wasn't really wearing a hat because some people say that if overdone, a hat can cause your hair to "thin out", or something like that. Personally, I have not experienced this firsthand.
:cry:.

ANYWAY-
I have oodles of experience with this particular product, and was fortunate enough to travel the challenging road of product testing prior to its initial introduction (and once again with the updated M105 formula). Through many prototype samples, I used several that were very low to NO dusting. However, inevitably I noticed a decrease in cutting power. You have alluded to the fact that if you overdo the addition of mineral oil, you would lose cutting ability. I agree 100%.

But the "overuse"point is not toggle switch-like, it's dimmer switch-like.
In other words, it's a gradual change, perhaps not initially noticeable but there certainly is a change to the dusting, to the cutting power, to the paint swelling, etc.

I just have a feeling that you have not yet seen the true cutting power of this product. If you've encountered endless problems with the application of M105, then I can only conclude that you've either got a bad batch (which I think you mentioned a watery consistency in your bottle), or that you live in an environment where M105 is not user friendly, or that you are comparing its characteristics to a very forgiving and ultra-easy to use product, or that there is an application procedural issue.

I want to again reiterate that this is NOT an attack on you or your methods. Just trying to get to the bottom of things. Thanks!
 
This is a good post and is getting attention, that is good.

Good observation...


It's been very interesting to watch over the years how the talk taking place on discussion forums has become valuable feedback valued by smart companies.

In the big picture, this thing we call a "discussion forum" has evolved to become a major "touch point" for any company that wants their piece of the market and it's only been around for about 10 years...

Discussion Forums - A relatively "new" invention...


I'm confident we'll see even more integration between discussion forums and businesses into the future...


:)
 
On another note how does the working time of the consumer line of SMAT products compare say for UC and ScratchX 2.0 since these have reduced cut from M105? Thought it might save me some mixing if this worked out to be a longer working time.

I find UC to have a longer working time than 105 with slightly less cut. UC has more cut than WG TSR, which is a nice swirl remover, and UC actually finishes quite well. UC also doesn't dust as much as 105. I was able to remove etched water marks from an Audi A4 this summer with UC when WG TSR, ScratchX and Opt Compound II wouldn't. I still prefer 105 for its correction capabilities as it takes longer with UC.

ScratchX 2.0 wouldn't touch the water marks but I use it for cleaning up scratches under the door handles, cleaning up minor scratches, and for removing black shoe marks in the door wells by hand.

In reading Kevin Brown's comments in this thread, I need to revisit pad priming and my correction technique to see if I can resolve my issue with 105's dusting. 105 does a good job of quick correction, so it's nice to keep different tools in the old toolbox.
 
Thanks for the great read on this topic. I thoroughly enjoyed reading it. I am learning a lot (again), and would like to learn more.

Can someone please direct me to postings/threads that discuss proper pad priming techniques, as well as proper on the fly pad cleaning techniques for both a DA (PC) and a Flex?

thank you again.
 
...Can someone please direct me to postings/threads that discuss proper pad priming techniques...

Here's an oldie but goodie about pad priming by PorscheGuy997. Simple, to the point:
A look into Pad Priming - The Kevin Brown Method - Car Care Forums: Meguiar's Online

Here's a recent thread about using the random orbital. In it Mike shows how to clean on the fly:
D/A Buffing 101 – An Introduction to the G110v2 (and similar) - Car Care Forums: Meguiar's Online

I KNOW that Mike Phillips has written about this many times.
I just typed in "cleaning pad on the fly" at MOL and this came up near the top.
I thought Mike Phillips' thread would be at the top.
Again- MP will likely provide an Autogeek link, too!

Just had a quick question for you kevin. You said earlier that its not a good idea to spread the product over your work area by dragging the pad along the area you're working. I was just wondering what process do you use to get the product evenly over your work area?

With that being said, I agree this is a great post and has lead to some good replies/questions/info etc.

Personally, thou sometimes it doesnt work, I'm a fan of thinking outside the box. Even if it doesn't work, failure is only a process. It only becomes the 'end of the line' if you choose to stop trying...but as long as you keep goin at it, learn from your mistakes and try to get better, you're moving in the right direction.

I've tried a lot of things, screwed up a lot of things lol, but in the end I usually end up being better at WHATEVER it is that i'm working on just because I have a 'never say die' attitude. It can be a pain in the butt and frustrating, but its worth it when you hit that light bulb moment where everything starts to come together and make sense.

Good thread, good replies and :dblthumb2:
 
How to clean your foam pad on the fly


When using a dual action polisher to remove below surface defects with any type of abrasive product you’re going to have two things building up on the face of the foam pad that you need to clean off.
  • Spent residue - From the product you’re using.
  • Paint - Small particles of paint that are coming off the car as you abrade the surface

If you’re working on a clear coat finish then keep in mind you won’t see the paint residue building up on the pad because the clear coat paint is clear. :idea:

Make sense?


If you’re working on a clearcoat finish, all you're going to see is the color of the product that you’re using. For example if you’re using a white colored polish you’ll see white residue building-up on the pad.

Now if you’re working on as single stage paint then you’ll see the color of the paint on the car on the face of your foam pad,. For example if you’re working on a single stage yellow paint system then you’ll see yellow paint on the face of your foam pad.

The important thing to understand is that as you work on the car with your polisher you’re going to be removing a little paint and there’s going to be used-up product and paint building-up on the face of the foam pad. It's important to clean this gunk off your pad often.

So the question is, how to you clean this gunk off the pad?

The answer is there’s a number of ways to clean your foam pad, the three most common are,
  • Pad Washer
  • Nylon Brush or Pad Cleaning Brush
  • Terry Cloth Towel
Out of the 3 options listed above, cleaning your pad on the fly is probably the most popular because it’s fast, and most people have a terry cloth towel in the linen closet that they can use to clean the pad.

The best way to clean a pad is with a pad washer but before you can use a pad washer you must first own one. Pad washers are worth their weight in gold if you buff cars out with any kind of regularity. If however you’re just buffing out your own personal cars, then chances are you don’t own a pad washer but chances are very good you do own a terry cloth towel or two that you can use to clean your pads on the fly.

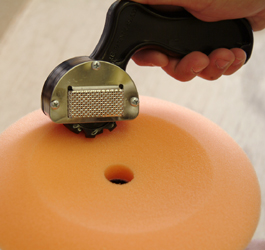
Brushes work good if you’re using a rotary buffer but the only way you can use one with DA Polisher is to turn the polisher off, hold the polisher and pad in such a way that the pad won’t spin and then rub the brush over the face of the pad to scrape off the residue.

While this works, it means turning the polisher off, (now you're not buffing out the car, remember the time issue?) and grabbing your brush and then brushing the pad. Nothing wrong with this but when you consider how long it already takes to do the cleaning step, (about 4-6 hours for an average size car and that’s if your good at this and if you work fast and don’t take any breaks. So stopping the polisher and using a brush to clean the pad works but it’s not as fast or effective as using a terry cloth towel.

The whole idea and success behind the cleaning your pad on the fly technique is in that it allows you to clean your pad quickly, (that’s the on the fly part), and then quickly get back to work.

Again, buffing out an entire car using a dual action polisher from start to finish is an all day job. There is no time for lollygagging. If you lollygag or take long breaks, you either won’t get the job done in one day or you’ll sacrifice doing a quality job during the cleaning step in order to get to the waxing step so you can put the car back into service. :dunno:


So let’s take a look at how to clean your pad on the fly

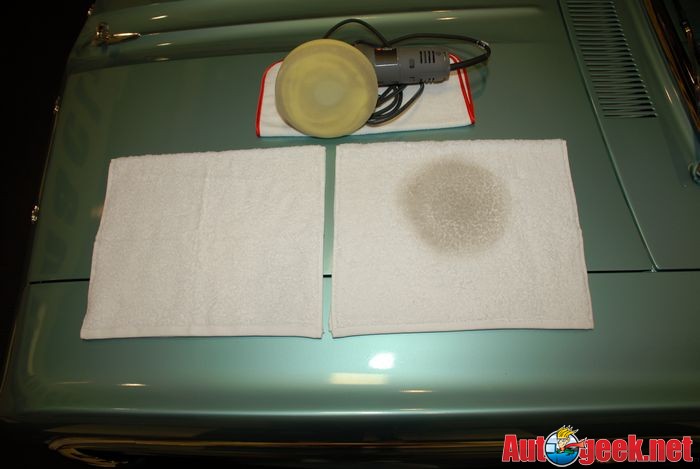
Cleaning your pad on the fly is where you take a terry cloth towel, usually a medium size hand towel works best, you fold it in two and then simply hold the towel against the face of the pad and then turn the polisher on and use your hand that’s holding the towel to push the towel into the foam. This will act to draw any excess liquid out of the foam and any excess residue off of the face of the pad.


After polishing a section of the trunk lid on Harvey,

Harvey.jpg


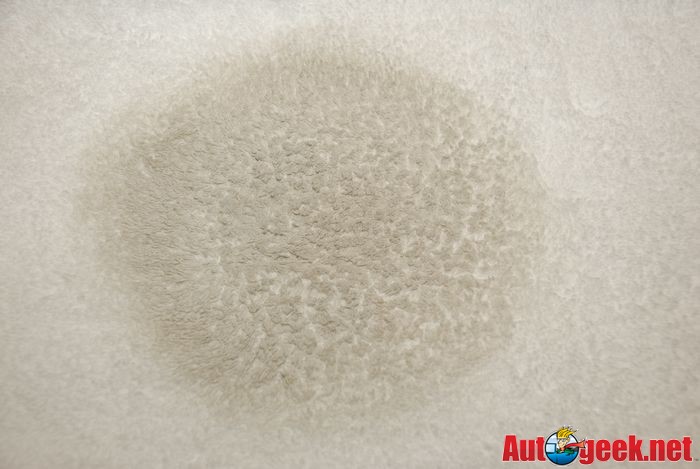
Max's classic 1964 Ford Falcoln Future, we took a brand new 100% Cotton Terry Cloth Towel and held it against the face of the foam pad and then turned the polisher on and pushed and smooshed the towel against the pad for about 45 seconds or so and here are the results.

CleaningPadOnTheFly004.jpg


CleaningPadOnTheFly005.jpg


Question: Why use terry cloth instead of microfiber?

Answer: Great question!

100% cotton terry cloth is very good at absorbing liquid, so when you push the terry cloth into the foam the liquid in the foam will transfer into the terry cloth fibers through capillary action where the cotton fibers will more or less hold or trap the liquid inside of themselves.

There’s more to it than that however, the nap of terry cloth, that is the little cotton loops, will help to slice into the caked and gummy reside which will loosen its hold so the residue will transfer to the towel as well as some will fall to the ground.

Compared to most microfiber polishing cloths with a nap, not the type that has flat woven surface, the terry cloth nap, (the nap is the the little tiny loops of cotton fiber), is more stout and it’s this extra stoutness that enables a large, nap terry cloth towel to work better to break-up the residue on the pad.

So it’s both the absorbency of the cotton fibers plus the larger size of the cotton nap that together make a terry cloth towel better for cleaning your pad on the fly.

Does that make sense?

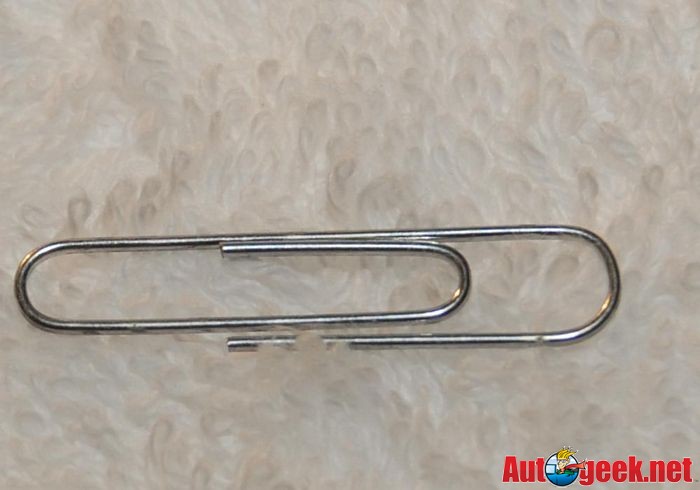
The nap of 100% Cotton Terry Cloth Toweling
TerryClothNap.jpg


Conversely, isn’t one of the reasons microfiber polishing cloths are so popular for wiping paint is because the fibers are microscopic in size and thus are more gentle to paint than larger cotton fibers? (The answer is “yes”)

You can use what you like and make up your own mind. Besides the case I’ve made above for using terry cloth another reason is to save your microfibers for where they excel best and that’s wiping residues off polished paint.

Some might also make the case that 100% cotton is better at absorbing while microfiber materials are better at adsorbing but that’s probably getting just a little too deep for what is actually a very simple method of cleaning your foam pads while buffing out a car.

Try both the next time you’re working on a car and come to your own conclusion but for me I’ll use terry cloth towels for removing residues off my pads and I’ll save my microfibers for carefully cleaning residues off paint.


Question: What about pad cleaning brushes?

Answer: I touched briefly on this above, but let's drill down a little deeper. Pad cleaning brushes or even a nylon toothbrush work great for cleaning residue off the face of a foam pad when the foam pad is on a rotary buffer but they don't work well at all when the pad is on a dual action polisher.

About the best you can hope for is to clean the very center of the pad when the tool is turned on but as you draw the bristles of the brush towards the outside of the pad the increased pressure over a small area, (the bristles of the brush pushing down on the foam), is enough pressure to engage the clutch in the tool and stop the pad from rotating.

The brush only cleans the pad if the pad is rotating. Thus brushes don't work well for cleaning pads on dual action polisher when you're trying to clean the pad while the polisher is turned on. Give it a try sometime and you'll see exactly what I mean.

For years when someone asks about the cheapie rotary buffers you can buy at Harbor Freight for buffing out paint, I would always mention that if nothing else, they make a great pad cleaner. That is take your dirty pads and one at a time place them on the backing plate of the rotary buffer and then use the rotary buffer to clean your pads. Rotary Buffers are direct drive tools and have a lot of power and a little brush held against the face of the pad isn't enough to slow the tool down so they work great for cleaning pads as well as removing a lot of paint quickly if you're using a RB to buff-out paint.


The cleaning your pad on the fly technique works well for all the popular dual action polishers on the market including,
  • Porter Cable 7424XP
  • Porter Cable 7424
  • Porter Cable 7336
  • Ultimate Detailing Machine – The first generation was Autopia’s design. The second generation is a re-badged Porter Cable 7424
  • Meguiar’s G100a – Re-badged Porter Cable 7424, came with a lifetime warranty
  • Meguiar's G100 – Re-badged Porter Cable 7424, came with a 1 year warranty.
  • Meguiar’s G110 – Meguiar’s design
  • Meguiar’s G220 – Meguiar’s design – 220 Volts
  • Griot’s Garage Professional Random Orbital Polisher – Griot’s design
Products mentioned

Dual Action Polishers
Porter Cable 7424XP
Meguiar’s G110
Griot’s Garage Professional Random Orbital Polisher

Pad Washers
System 2000 Pad Washer
autogeek_2069_56035322


Grit Guard Universal Pad Washer
autogeek_2066_109373346


Pad Brushes

The Edge Foam Pad Conditioning Brush
autogeek_2066_96817874


Duo-Spur at Autogeek
duospur2.jpeg


Cobra Detailing Brush Kit
autogeek_2068_207913


Further Reading
Tips & Techniques for using the Porter Cable 7424XP


Resources
Autogeek Online Detailing Forum
Autogeek Online Store

:xyxthumbs:
 
Mike... thanks for the links. Since the Flex is somewhat of a hybrid (DA, but rotary results), which on the fly pad cleaning method do you recommend for it?
 
Mike... thanks for the links. Since the Flex is somewhat of a hybrid (DA, but rotary results), which on the fly pad cleaning method do you recommend for it?

I don't.

Because of the very pronounced movement of the pad it will have a tendency to not work at all if you try the cleaning your pad on the fly technique like you would with a Porter Cable style polisher.

This is why I didn't list it in my list of tools that this technique works with...

At this time, simply clean the pad with the tool turned off, use a nylon brush like a Pad Conditioning brush or even a toothbrush.

Use a terry cloth towel, (clean of course), and the nap of the towel to give you some scrubbing and absorbing power by simply agitating it against the face of the pad, again with the tool turned off.

A Grit Guard Pad Washer works well to for non-wax, non-sealant type products...


:)
 
Back
Top