Navigation
Install the app
How to install the app on iOS
Follow along with the video below to see how to install our site as a web app on your home screen.
Note: This feature may not be available in some browsers.
More options
Style variation
You are using an out of date browser. It may not display this or other websites correctly.
You should upgrade or use an alternative browser.
You should upgrade or use an alternative browser.
Toyota Tacoma Exterior/Interior/ENGINE!
- Thread starter Wills.WindowsAndWheels
- Start date
Wills.WindowsAndWheels
New member
- Oct 31, 2009
- 1,682
- 0
- Thread starter
- #22
was just using the search feature because I was thinking of washing and waxing my buddy's 3 year old, neglected, Tundra. I had this vision of making that nice blue paint show itself again and blind everyone who looked at it (like staring at the sun) causing traffic accidents and many explosions that send vehicles rocketing skyward, causing more accident upon landing.
After seeing your work, I have been brought back to reality!
Holy cow. Some day I'll be doing fine work like that.
For now, I just hope his truck doesn't need to be clayed because I haven't even moved up to power yet.
Very nice work!
Lol hey man don't count yourself out just yet. Yes it takes work and practice and TIME and dedication but you CAN do what you are aiming for (well maybe minus the whole accidents and explosions part
") ).
).If you can invest a couple hundred bucks into some equipment...you'll be able to make a pretty decent difference.
Honestly even if you just do a wash and wax, i'd clay it if its 3 years old. Im sure it needs it...its not that difficult, just keep the surface wet and take the extra 30 minutes or so to do it...that time you invest will be saved in the end when you wax. How? Because first of all you wont have to keep cursing and changing wax pads because the bonded stuff that the clay WOULD have removed is now coming off on your wax pad.
Secondly the wax will just GLIDE on...nice and easy like waxing glass.
Lastly, when you go to remove the wax, it will GLIDE off...no dragging or snagging (as long as you apply a THIN layer of wax, other wise the thick globs of wax will grab your MF towels).
Get yourself a Griots polisher for about $100...maybe 4-6 5.5" pads (assorted) and some Meguiars D151, a few good MFs and a nice clay bar (even over the counter, Mothers clay bar kit is nice). Hopefully you have decent washing supplies already. Give it a shot and you'll be impressed. If you want to invest a little more...get the Meguiars Microfiber System set up with 5.5" pads (and i'd get a couple 3" pads too but 5.5" will do 95% of the work). You will LOVE how it works ...if you thought this truck came out nice, check out this Camaro we did 2010 772 HP BLACK Camaro SS...Swirl City - Auto Geek Online Auto Detailing Forum
Awesome work will! Looks like someone forgot about the oil fill cap when they were changing the oil to me. What a mess it makes, specially on a overhead cam lmao. That is a really great turn around bud! :xyxthumbs:
Haha it DOES look like that doesn't it? Big mess but big turn around
Great job on the engine bay detailing! Did you only use a steamer or needed APC and brushes?
Oh no i used APC+ at about 4:1 on the bad spots and the spots down in the engine the steamer couldn't reach. I also used Meguiars degreaser at about 5:1 and a pressure washer to spray down in the deeper parts of the engine that my hands brushes couldnt reach.
I used a tooth brush, a short bristled paint brush and a brush used to clean spray guns...those 3 work great for tight spaces
Kristopher1129
New member
- Jan 3, 2011
- 2,861
- 0
Nice job man! Glad you're staying busy with detailing!  rops:
rops:
rops:Wills.WindowsAndWheels
New member
- Oct 31, 2009
- 1,682
- 0
- Thread starter
- #24
Nice job man! Glad you're staying busy with detailing!
Lol trying to man. This is a few months old (the post), but i just looked and it has something close to 1,300 views lol...not too bad for a little Tacoma :dblthumb2:
Dubbin1
Active member
- May 28, 2009
- 3,845
- 0
Good work and it turned out great but I would have to argue that a little photo manipulation was done on those before and after interior shots. Perhaps a white balance change or something done in photoshop. The tones on everything are way to far off to just be from cleaning.
Wills.WindowsAndWheels
New member
- Oct 31, 2009
- 1,682
- 0
- Thread starter
- #29
Well, you get a damnnnnnnn from me. Keep up the good work, and the good posts.
Lol thanks a lot...hope to have more to come soon. If you havent checked out my Camaro write up 'Swirl City' you should ...that car turned out sweeeet.
Car just went up in Value!
Awesome Work!
I sure hope so :xyxthumbs: Glad you liked it
You guys who post these miracle turn arounds are awesome!!! Like I said before ..."hats off to the pros". Great work!!
Yea gold paint doesnt show off the the paint correction AS WELL but you can still tell the difference. I think the engine was the biggest hit in this detail
rops:Good work and it turned out great but I would have to argue that a little photo manipulation was done on those before and after interior shots. Perhaps a white balance change or something done in photoshop. The tones on everything are way to far off to just be from cleaning.
Wow yea you caught me..i busted my ass for almost 2 hours on just the engine...then for twice that long on the paint but then thought, you know what, lets compromise the integrity of my posts and PHOTOSHOP the interior...the least difficult job on this detail at least...yeah you caught me...really?
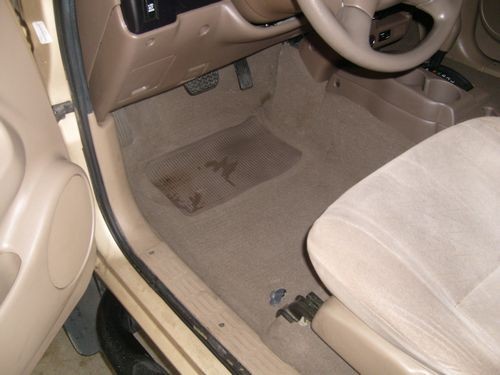
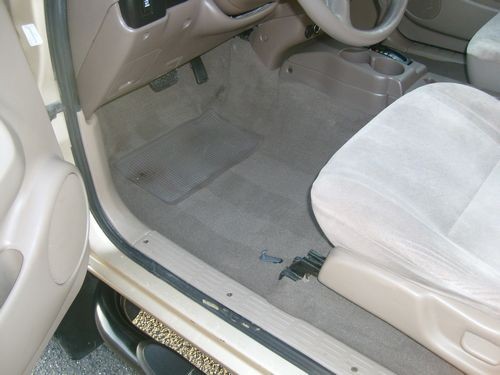
First off the floor mat shot alone should show things were cleaned properly..the concrete and surrounding objects look the same in both photos. As for the interior photos, maybe you dont have 'red clay' where you're at...but out here...when you have dust storms like these [ame=http://www.youtube.com/watch?v=8W4Cx44XKZ4]Phoenix Dust Storm: Video of Doomsday Scenes in Arizona - YouTube[/video] ...guess what...the inside does get quite dusty.
Did something change...yes..but i didn't fu**ing photo shop it...if you start at 10 a.m and end near sun down..the lighting does have a tendency to change some...but to say that i hacked my own photos on the INTERIOR, after seeing the hard jobs like the engine and paint were meticulously taken care of, is rude and offensive to say the least. And even with the light change...you can still see the drastic different, and not ALL of that was from the change of light, it was from that red dirt we have out here in the desert being steamed off the seats.
Dubbin1
Active member
- May 28, 2009
- 3,845
- 0
No need to get so upset. Maybe its the camera settings but there is a different tone change to the interior pictures.
These 3 pictures are what really give it away. That interior IS tan not gray.
The paint color difference in these first two pictures alone show that something isn't right.

These 3 pictures are what really give it away. That interior IS tan not gray.
The paint color difference in these first two pictures alone show that something isn't right.
Wills.WindowsAndWheels
New member
- Oct 31, 2009
- 1,682
- 0
- Thread starter
- #31
No need to get so upset. Maybe its the camera settings but there is a different tone change to the interior pictures.
These 3 pictures are what really give it away. That interior IS tan not gray.
The paint color difference in these first two pictures alone show that something isn't right.
I was referring to the main seats...not the actual dash board or floor mats..
Dubbin1
Active member
- May 28, 2009
- 3,845
- 0
I was referring to the main seats...not the actual dash board or floor mats..
So you're saying that this truck has gray seats mounted on tan trim and the rest of the interior is tan???
Rayaz
New member
- Aug 1, 2010
- 429
- 0
This guy and his sister are double tough and do great work:dblthumb2: I did my wife's black SUV yesterday and almost crapped out from the heat! The garage is like a self-cleaning oven! Heat advisory for the past week and humidity to go with it. This was without running a buffer/steamer/extractor and I found myself drawn toward the light...
Wills.WindowsAndWheels
New member
- Oct 31, 2009
- 1,682
- 0
- Thread starter
- #34
So you're saying that this truck has gray seats mounted on tan trim and the rest of the interior is tan???
I'm saying they are two-tone. The edges are tan...but the middle of the seat where your ass sits and the back ARE gray.


Make me have to dig into my archives of pictures just to prove it. It was the GRAY section (that looked tan in the before photos) that i was pointing out was NOT tan..but was actually gray....no i was not trying to say the tan was gray as well.
Dubbin1
Active member
- May 28, 2009
- 3,845
- 0
no i was not trying to say the tan was gray as well.
That I can believe and understand what you are talking about now. The pictures are showing something totally different.
Wills.WindowsAndWheels
New member
- Oct 31, 2009
- 1,682
- 0
- Thread starter
- #36
This guy and his sister are double tough and do great work:dblthumb2: I did my wife's black SUV yesterday and almost crapped out from the heat! The garage is like a self-cleaning oven! Heat advisory for the past week and humidity to go with it. This was without running a buffer/steamer/extractor and I found myself drawn toward the light...
lol next time just call us! Yeah we were out on Friday when it was 117 doing a few jobs...was a little warm...just a little lol. Glad you didn't go towards the light man!
Wills.WindowsAndWheels
New member
- Oct 31, 2009
- 1,682
- 0
- Thread starter
- #37
That I can believe and understand what you are talking about now. The pictures are showing something totally different.
ok but don't just jump to 'he photoshopped it'. If my wording was misleading in the write up, ok...but i was trying to point out that the LIGHT colored areas were BACK to being light colored (gray). That was my point. Asking would be more polite than accusing of forging my own pictuers...plus i dont even own photoshop :nomore:
Dubbin1
Active member
- May 28, 2009
- 3,845
- 0
ok but don't just jump to 'he photoshopped it'. If my wording was misleading in the write up, ok...but i was trying to point out that the LIGHT colored areas were BACK to being light colored (gray). That was my point. Asking would be more polite than accusing of forging my own pictuers...plus i dont even own photoshop :nomore:
check the PM I just sent, it will explain a bit more
BTW the first thing I thought was the white balance is different, which it is. I wasn't jumping on the he photoshopped it quite yet

LOL ok maybe not PS there are other photo manipulation software out there. You had to of used something that resized the pics and removed the photo info from them
Wills.WindowsAndWheels
New member
- Oct 31, 2009
- 1,682
- 0
- Thread starter
- #39
Good work and it turned out great but I would have to argue that a little photo manipulation was done on those before and after interior shots. Perhaps a white balance change or something done in photoshop. The tones on everything are way to far off to just be from cleaning.
Well whether you meant it or not...that is what you said...which is why i took offense...and i replied to your PM
Dubbin1
Active member
- May 28, 2009
- 3,845
- 0
Well whether you meant it or not...that is what you said...which is why i took offense...and i replied to your PM
I understand what you're saying but you also have to understand by looking at your pictures that it looks like you were trying to tell a different story. Trust me, I'm not the only one that was questioning it until you posted that last picture and explained that these seats are two toned.