Headlight Restoration-new UV sealant idea

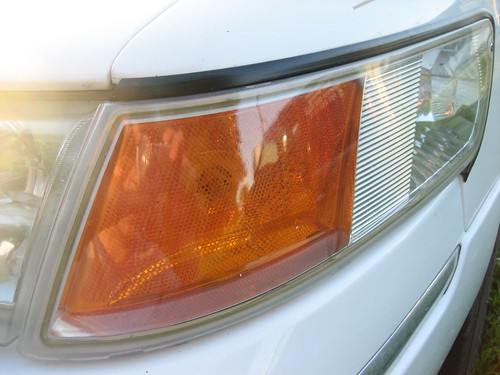
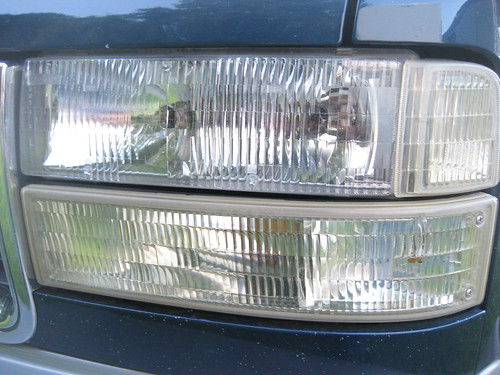
Thanks David and Adam for your insight. What I might do is raise my prices a little on lens restoration, and offer the customer a "maintenance kit" for headlights and give instructions on how to use it. Basically, the maintenance kit would include an ounce or two of regular paint sealant (wolfgang, klasse, BFWD etc...) a couple of microfiber rags and an applicator. And explain to the customer to apply the sealant every 2-3 months as needed to help make the restoration last longer. Now, some customers may never use it, but if I educate the customer about maintenance then it might be worth my time, and it also might prove that I go the extra mile.

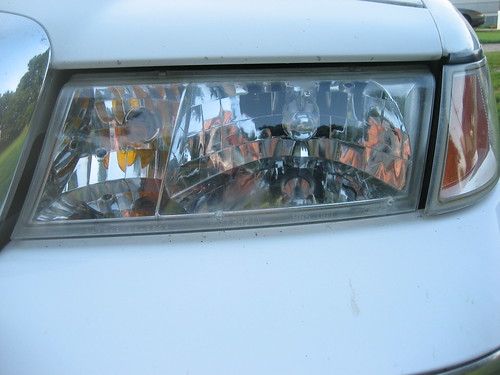
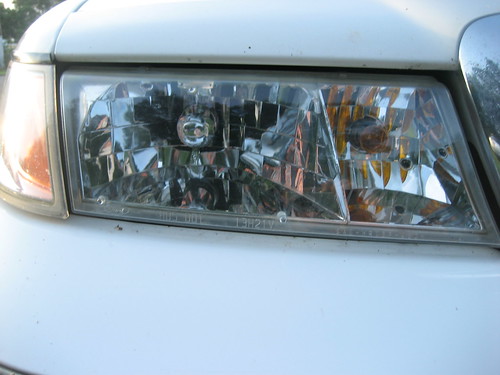
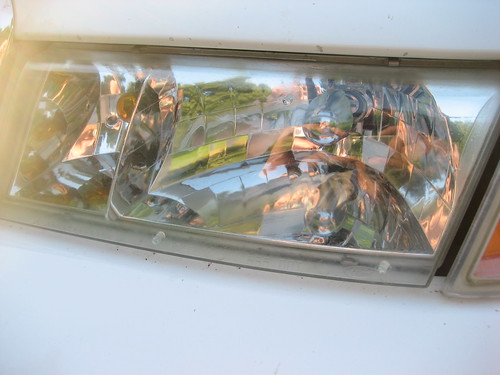
I am currently testing the spar urethane on all lenses on my work van, but it gets washed regularly and sealed with BFWD or whatever sealant I am using when I seal the paint on my van. Whenever I seal the paint, I also seal the plastic headlight and tail light lenses with the paint sealant. Now, the white mercury that is the "test car" in this thread sees no maintenance besides the occasional wash job every couple of months and never sees a garage.
 
You can buy small aerosol spray cans of top coat it is for clear coat repair.

I have used it before on my paint and it should work on lights.
This would cost less and no mixing and clean-up just prepare the surface and spray.

My lights do not need anything done too them but if they did I would try the clear coat in a spray can.

Would you sand it before spraying? If yes, would the spray make the sanded headlights clear again?
 
Wow, i just read ALLLLL 11 pages of this thread...my eyes need restoration!

sounds like a good idea. I just did the 105/205 method on our taurus and it turned out nicely...didnt sand thou...you think sanding is pretty much manditory or can you get away without sanding sometimes?

here is the link to the write up i did on them if someone wants to take a look and give me some feed back on if sanding would have made a difference.

http://www.autogeekonline.net/forum/show-n-shine/25948-first-headlight-restoration-96-taurus.html

keep everything updated...i just so happen to have those exact materials (the clear gloss and mineral spirits) in the garage :)...might try it over the weekend...
 
since i live in Puerto Rico i cant find Helmsman Spar Urethane anywhere, even home depot, i found a can that is Ultra Spar Marine Urethane, clear, but on the inside is a bit brownish, its that typical???? also read extra UV protection but the color its what got me confused
 
since i live in Puerto Rico i cant find Helmsman Spar Urethane anywhere, even home depot, i found a can that is Ultra Spar Marine Urethane, clear, but on the inside is a bit brownish, its that typical???? also read extra UV protection but the color its what got me confused

If i remember correctly it does have a slight brown tint but dries clear (the helmsman that is) Its been over a year since i used it on a door, but i think it had that brown tinge too. Now I could still see to the bottom of the can...it was totally transparent...but just a brown color, is that what you're finding?
 
Wow, i just read ALLLLL 11 pages of this thread...my eyes need restoration!

sounds like a good idea. I just did the 105/205 method on our taurus and it turned out nicely...didnt sand thou...you think sanding is pretty much manditory or can you get away without sanding sometimes?

here is the link to the write up i did on them if someone wants to take a look and give me some feed back on if sanding would have made a difference.

http://www.autogeekonline.net/forum/show-n-shine/25948-first-headlight-restoration-96-taurus.html

keep everything updated...i just so happen to have those exact materials (the clear gloss and mineral spirits) in the garage :)...might try it over the weekend...

sanding is not necessary in all cases if you can polish them to clear then you have accomplished the goal. i just did a set of headlights on an older 3 series bmw. One light was completely yellow but as this was an add on (freebee) for a friend after cleaning the car i just polished them to make them look a little better. i used megs solo and 4" foamed wool pad and they came out clear. i thought for sure they would need sanding.
 
keep everything updated...i just so happen to have those exact materials (the clear gloss and mineral spirits) in the garage :)...might try it over the weekend...
FWIW Minwax Helmsman Spar Urathane is now (recently) available in a water based version. Helmsman Spar Urathane is also available in spray (Rattle) cans pretty much everywhere paint is sold. I have also played with the (Mentioned early in this thread) Sem 21013 Solaray UV Headlight Repair spray. The Sem really needs to be UV cured. I have cured Sem with an 800 watt facial tanner, took about 5 minutes 18" away, it can sit out in roomlight for hours and barely get tacky. The cottonwood is blowing here now so I have not tried it outside. Also the Sem is very expensive. I have done about 8 sets of headlights for friends using the rattle can over the last 3 months and so far no complaints.
 
Longevity Test- One year since original restoration

Ok, as promised here is the one year update. I have been doing updates every three months and we have finally reached a year in this test. By picture they look really good. But there is a slight "haze" at the very top edge of the headlight, nothing major and you have to get really close to see it. I'am wondering now if I did not get good coverage with the sealant on the edge or it was too thin of an application, or maybe I did not clean them up well. I think removing the lights from the vehicle would produce better results. So I might change that in my process.

These lights are on a 1998 Mercury Grand Marquis, it is never garaged, seldom washed and the lights, since restoration have never had a coat of wax or paint sealant as maintenance.

These were the first lenses that I used the spar urethane method with, so my technique of application has improved, which there is a little learning curve if you have never done anything like this.

To sum it all up. This sealant which is made for wood not plastic, works very well on headlights and tail lights. It can be a little finicky with the application, but I will continue to use it until there is something as cheap and easier to use than the spar urethane. Which is highly unlikely.

These lights are far from needing another complete restoration!

4734621294_dd755fe873.jpg


4733981163_e814618b0e.jpg


4733980125_669676cd80.jpg


4733978865_60b67f38c4.jpg
 
Last edited:
Here is another update on a pair of headlights restored with the spar urethane method. This is my work van(2000 GMC Safari), the headlights were pretty bad to begin with, so they were sanded, buffed and sealed with the urethane.

This test is about a year old, and these lights were washed regularly and applied a couple coats of paint sealant(BFWD or whatever I was using) every couple of months. This van is driven a lot and never garaged so it is exposed to the elements all year.

Since these lights were maintained after the restoration, there is absolutely no evidence of the urethane degrading or loss of gloss. However there was a slight loss of gloss and possibly haze on top edge of the 1998 mercury lights that was the original test subject of this thread. But that car was not maintained at all. My van lights were treated as if they were new since restoration.

4733985763_552e469746.jpg


4733983871_b58b1fe1b6.jpg
 
Solaray Headlight Lens Clear Coat is designed to be used with a U.V. Cure lamp. Although, I have used this product to restore a headlight lens and allowed the lens to stay out on a bright sunny day and it cures out just fine. However, Use of this method is the sole discretion of the purchaser and is in no way warrantied by the manufacturer or seller. Seems to me you could build your own curing 'table' using whatever UV bulbs you can get at Home Depot, or your local hardware store. You might need to experiment a bit with getting the right amount of UVA, UVB or UVC light, or at least copious amounts of each.
Reply With Quote
 
Here is another update on a pair of headlights restored with the spar urethane method. This is my work van(2000 GMC Safari), the headlights were pretty bad to begin with, so they were sanded, buffed and sealed with the urethane.

This test is about a year old, and these lights were washed regularly and applied a couple coats of paint sealant(BFWD or whatever I was using) every couple of months. This van is driven a lot and never garaged so it is exposed to the elements all year.

Since these lights were maintained after the restoration, there is absolutely no evidence of the urethane degrading or loss of gloss. However there was a slight loss of gloss and possibly haze on top edge of the 1998 mercury lights that was the original test subject of this thread. But that car was not maintained at all. My van lights were treated as if they were new since restoration.

4733985763_552e469746.jpg


4733983871_b58b1fe1b6.jpg

Wow man those really held up well. I know about those Safari headlights....my godfather has a 96' safari. the top of the lights have held up pretty good...but the bottom set are foggy as hell. We're trying to sell it right now, was thinking about maybe clearing them up to help the sale.

So you said that your technique has improved now that you have sorta mastered the learning curve of the process.

Could you describe step by step how you do it now and what you've changed since your first attempt at doing this process?

Great job and congrats on it holding up!
 
So you said that your technique has improved now that you have sorta mastered the learning curve of the process.

Could you describe step by step how you do it now and what you've changed since your first attempt at doing this process?

Great job and congrats on it holding up!
+1 :iagree:
 
So you said that your technique has improved now that you have sorta mastered the learning curve of the process.

Could you describe step by step how you do it now and what you've changed since your first attempt at doing this process?

Great job and congrats on it holding up!


Well, I'm not really a master at this technique, but I think my skill level has improved just with the experience of multiple applications. I have fewer goof ups. It just takes time to get comfortable with the applications, if it looks bad wipe it off with the mineral spirits before it starts to bond and start over.

Wiping the headlight 'side to side' with your applicator, starting at the top and ending at the bottom of the light usually will give the best results to get the urethane to lay flat without any runs. And sometimes I go over the light once more with the applicator to help 'even' things out(without reloading the applicator).

I also have added different wet sanding grits, I use 400, 600, 800, 1000, 1500, and 2000. Its polished out with M105 and M205. Cleaned with alcohol to remove polishing residue, then I use my air compressor to blow any moisture around the headlight(if light is still attached to car) Then I seal it, let it cure in the sun, or turn brights on, or use heat gun. Then I watch the customers jaw hit the floor when they see how big of a difference I made with the restoration.:xyxthumbs:

I also advise the customer to not drive the car on the highway for 24 hours to give it more time to cure, before it gets splattered with bugs. I am not for sure, but if it gets bug splattered right away before it has enough time to fully cure, it might etch into the urethane easier. So to be on the safe side, no highway driving for a period of time. Also pressure washing might not be good until it is fully cured and hardened.


Sounds great man. So you really use all of those steps of sandpaper with every light? How long does it usually take you to do a set of lights...and what do you normally charge a customer for this service? It sure seems like a much higher service than the standard yellowing removal and polish.
 
Sounds great man. So you really use all of those steps of sandpaper with every light? How long does it usually take you to do a set of lights...and what do you normally charge a customer for this service? It sure seems like a much higher service than the standard yellowing removal and polish.

Yeah, I usually use all those grits of sandpaper by hand. I need to switch over to wet sanding with a drill to speed things up a little. It usually takes me 1-2 hours to complete a restoration. In my area you can't get someone to pay more than $40-$50 per restoration even when you tell them how much a new set of lights will run. In other higher populated areas you could probably get $75 or more per set.
 
Yeah i was thinking of charging between 40-50 as well. I dont know that i'd do all those steps of sanding thou AND the sealant idea as well for that price.

Id have to test it out on some bad headlights and see how fast I could do it. Have you ever tried skipping the sanding and just going straight to compounding and maybe doing it twice...then polish...and then seal...or do you pretty much believe that all headlights that have yellowed need to be sanded?
 
The headlights that I have done need to be sanded because the factory clear coat is failing and needs removed first, and sanding is the only way to do it. It would be easier to just buff the lights if they did not have the clear coat on them. But from my experience, the lights that I restore all have remnants of the old clear coat.
 
The headlights that I have done need to be sanded because the factory clear coat is failing and needs removed first, and sanding is the only way to do it. It would be easier to just buff the lights if they did not have the clear coat on them. But from my experience, the lights that I restore all have remnants of the old clear coat.


Ah ok, makes sense. I was wondering if you can reuse the sandpaper or is it only for 1 job and then toss it?

It sounds like your pretty fast at what you do, and since i do my work with my sis i'm sure we can knock it out in an hour once we get our process down. For $40-50 i think it would be worth it to the customer, especially if i can promise them its not going to just fade back to yellow in a few months.
 
I charge $60 for headlight restorations. It's where you make the most hourly rate in detailing, at least for me it is. I usually knock out both headlights in 2 hours and that's $30/hr. for me here in Lynchburg. Detailing, I MAYBE make $10/hr. but the pay-off is SOOOO much better!
 
Back
Top